Overview#
This post explores using the Meraki vMX virtual device to build AutoVPN from branches into Azure. Of course it is possible, and common, to use IPSEC with typical Azure VPN Gateways for branch connectivity, but AutoVPN has some advantages over normal IPSEC, especially in the convenience department as your branch count grows. I am demonstrating the addition of BGP with AutoVPN to set myself up for an easier migration of each branch from IPSEC to AutoVPN.
As each branch becomes ready to migrate from an Azure VPN Gateway to AutoVPN, it’s just a matter of removing the Azure and Meraki side IPSEC configuration, setting the branch to a spoke with the correct hub, and letting BGP dynamically handle the routing required to steer traffic between Azure and Meraki branch networks.
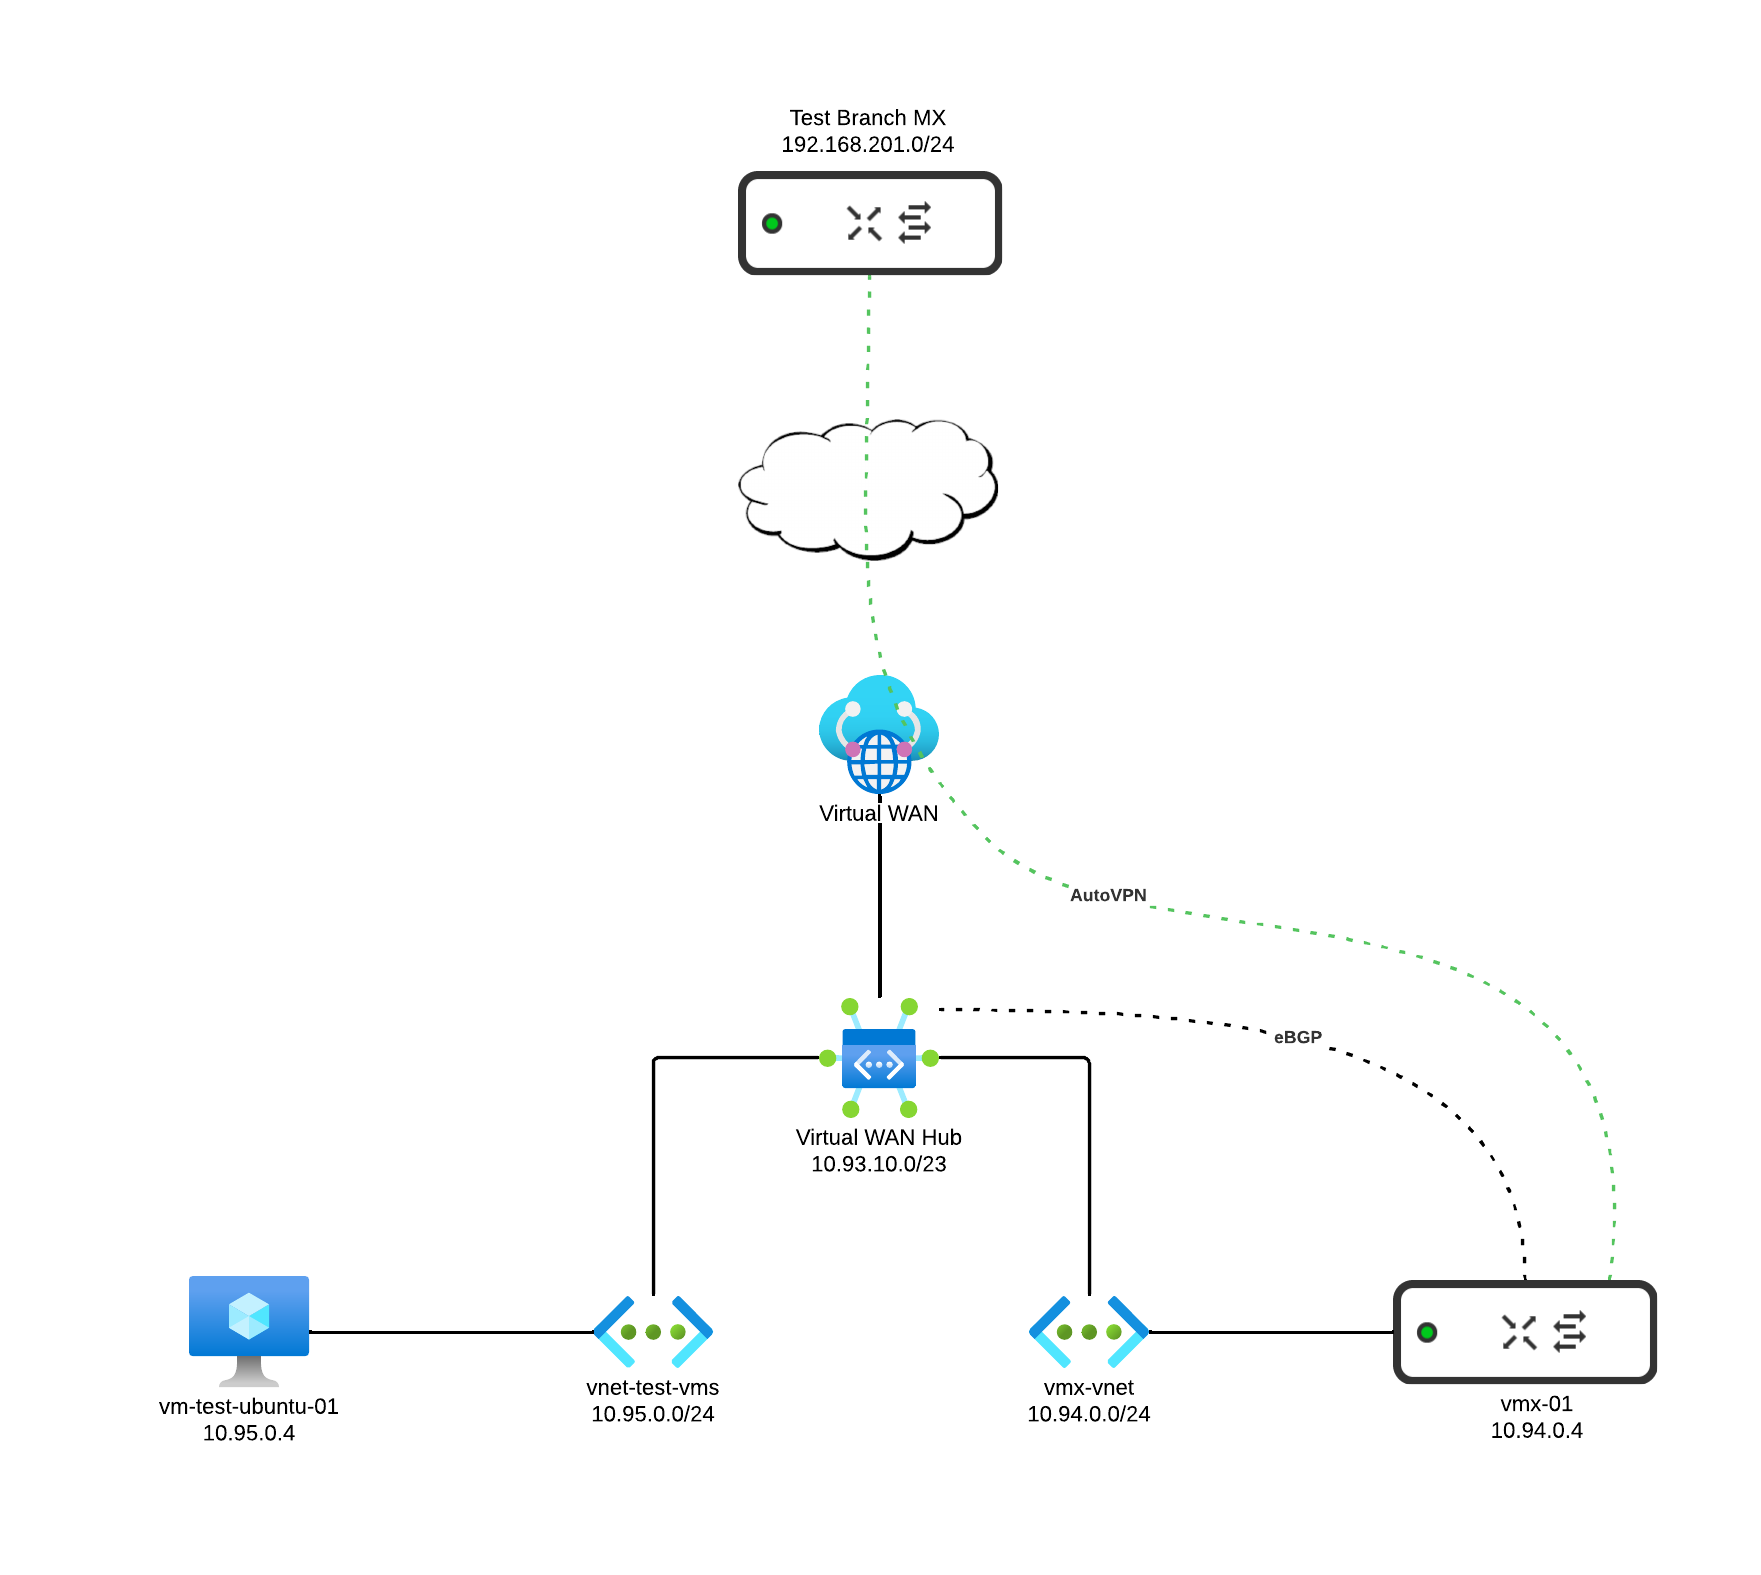
The vMX will only be used for WAN connectivity between branches, and not to provide any filtering services for traffic in/out of Azure on the public side. I’ll be demonstrating a single vMX device in a single Azure region. This vMX will BGP peer with Azure vWAN so that it can inject branch prefixes it learns via AutoVPN, and advertise prefixes for resources within Azure out to the branch WAN.
Meraki vMX Deployment Modes#
Meraki MX’s have two different deployment modes that can be used depending on your situation.
Concentrator (a.k.a. Passthrough) Mode#
Concentrator mode is what I want here, as I’m using the vMX purely to terminate branch VPN connectivity, and not to filter any traffic in/out of Azure. My VPN topology will be hub and spoke, where branches are explicitly configured to form tunnels to the vMX in Azure, but not between each other.
As a layer 2 passthrough device Choose this option if you simply want to deploy the WAN appliance:
- In bridge mode for traffic shaping and additional network visibility.
- As a one-armed VPN concentrator.
Routed Mode#
Routed mode doesn’t match my scenario. It’s more typically used on the branch side, where you’d want multiple SVIs and Internet perimeter filtering.
This is the default selection. Choose this option if you want to use the WAN appliance as a layer 7 firewall to isolate and protect LAN traffic from the Internet (WAN). Client traffic to the Internet will have its source IP rewritten to match the WAN IP of the appliance. In this mode, the WAN appliance is generally also the default gateway for devices on the LAN. This section also provides a link to the DHCP settings page.
BGP with Meraki#
Enabling BGP under site to site VPN activates BGP on all MX’s in your Org. Hubs (in concentrator mode) eBGP peer with an upstream layer-3 device, and will inject the prefixes they learn from AutoVPN branch sites. Under the hood of AutoVPN, iBGP runs between hub(s) and spokes in a single Meraki AS. Meraki BGP documentation link below.
Topology#
Here is the topology of what I’ll be building.
Azure Make Ready#
In order to deploy a vMX in Azure, we’re going to need some Azure pre-requisite resources. I’ll build everything from scratch to show all the steps from an essentially empty Azure tenant. You can also bolt on to an existing vWAN / vHub if it already exists in your environment.
- Resource Groups to your organizational preferences
- A Virtual WAN (vWAN)
- A Virtual Hub (vHub) attached to the vWAN above
- A vNet for the vMX to reside in, connected to the vHub
- A vNet for a test VM to reside in, connected to the vHub
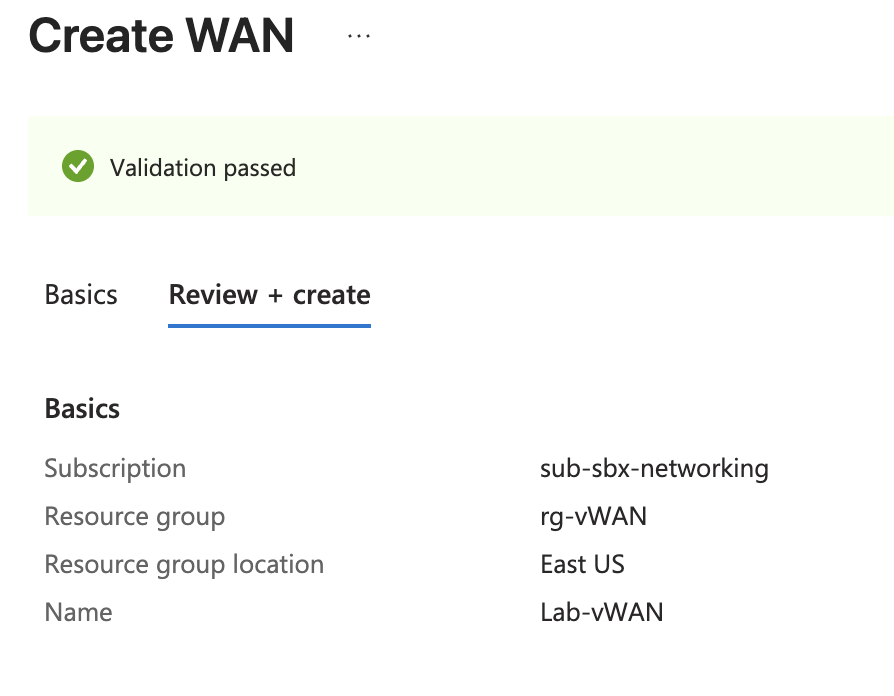
Create vWAN#
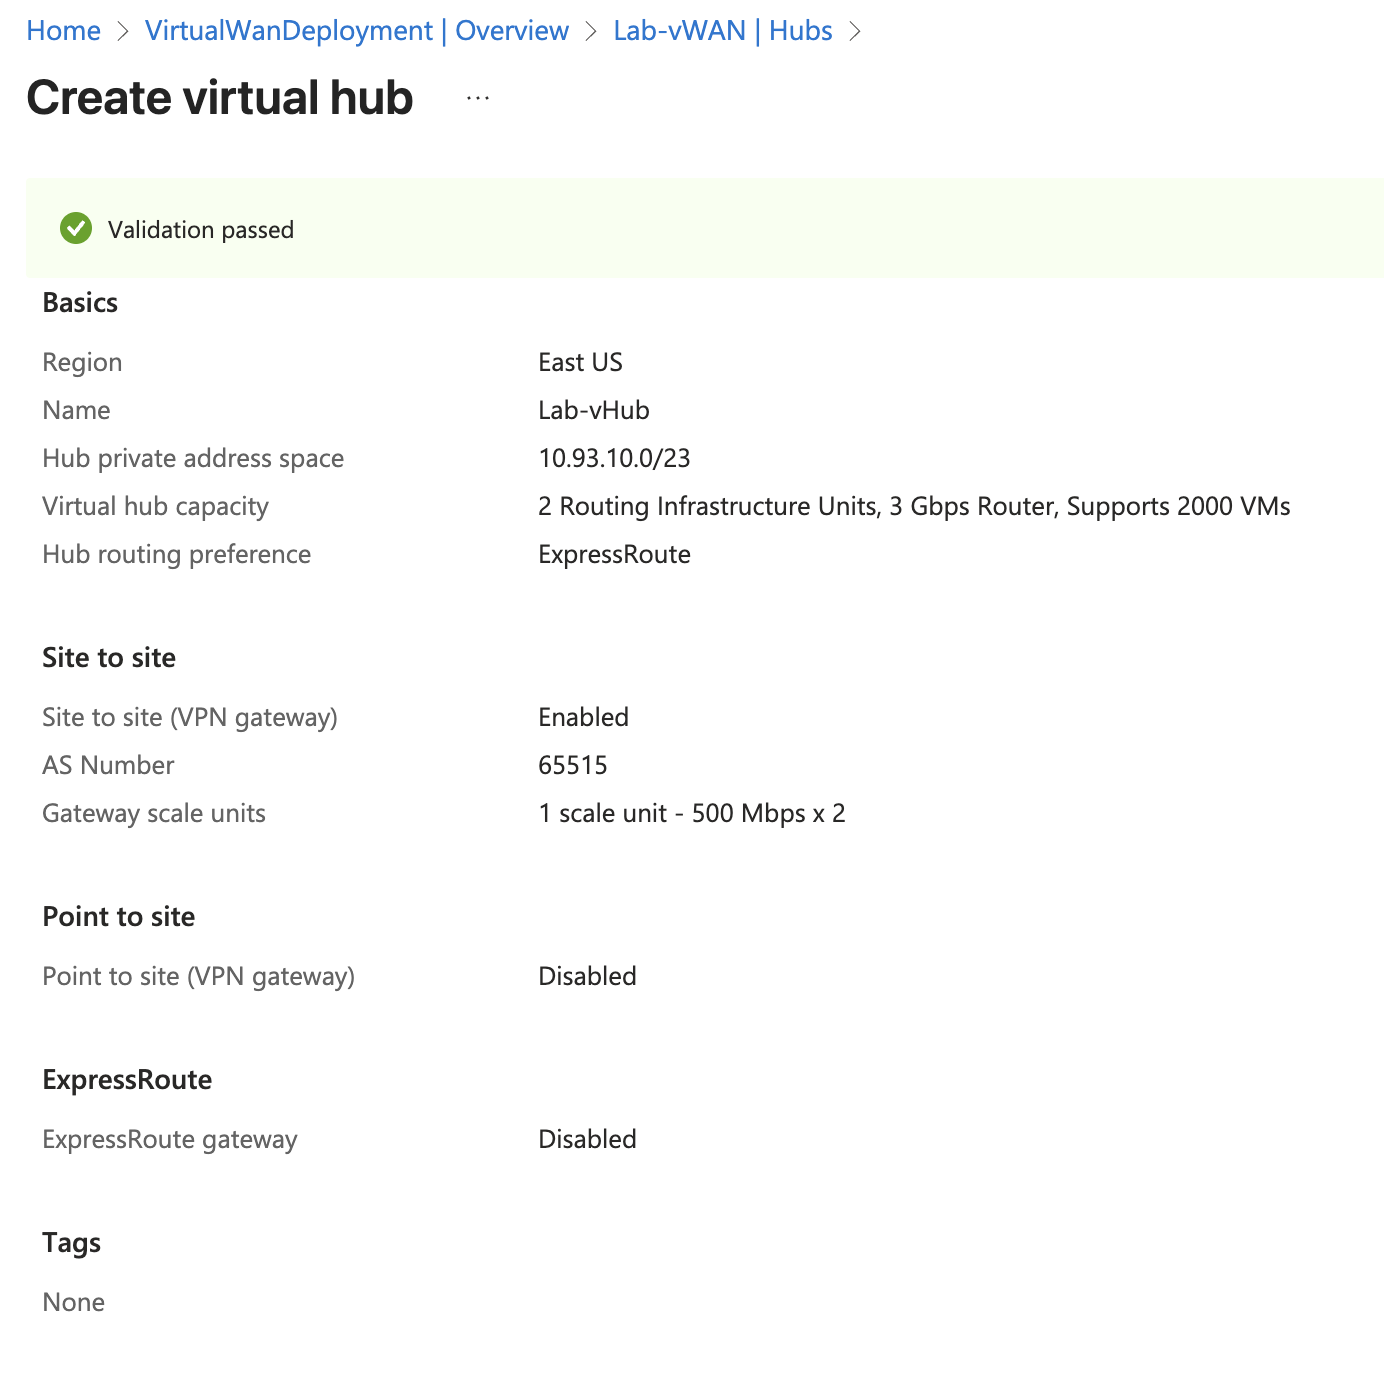
Create vHub#
I chose 10.93.10.0/23 for the vHub prefix. I also enabled Site to Site, which creates a Virtual Network Gateway in the background. This is not necessary for the vMX. I only did that because I have other use cases I’ll be labbing with this vHub. vHub creation is quite slow in Azure, and typically takes about 30 minutes.
Deploy Azure Test Workload#
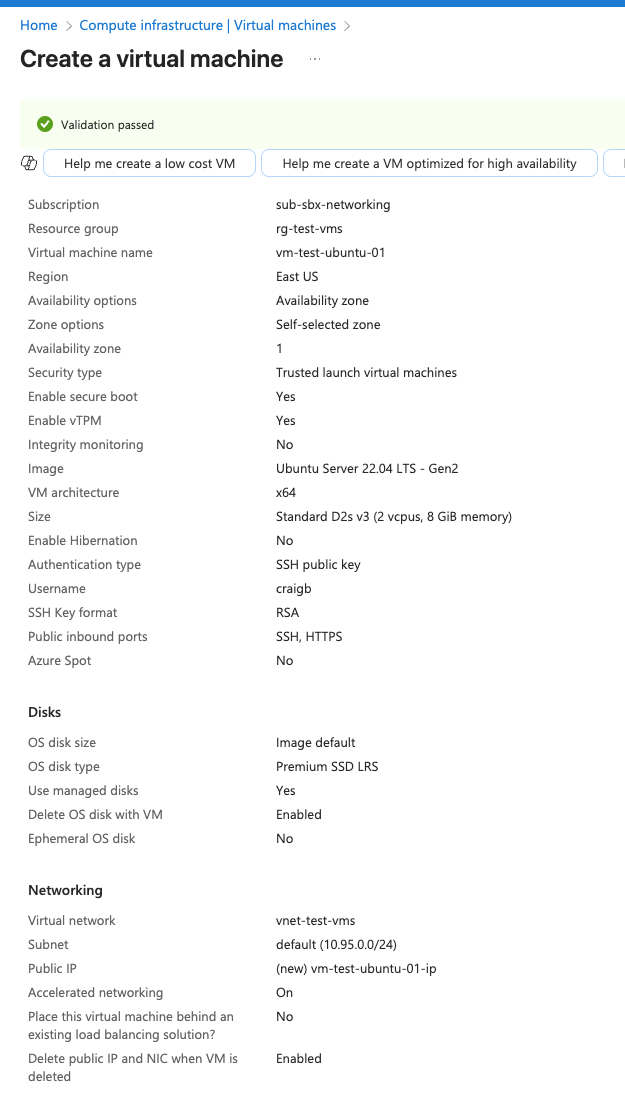
In order to have an endpoint to test with, I’ll create a Ubuntu VM in Azure. I first create and attach a vNET for test VM. I gave this vNet the prefix 10.95.0.0/24 and used the whole /24 for the subnet.

Next the new virtual machine vNet needs to be attached to vWANs vHub. This will trigger propogation of this vNets prefix into vWAN so that it can be advertised to the vMX via BGP.

Now create the test VM itself, attaching to the correct vNET.
Meraki Dashboard Make Ready#
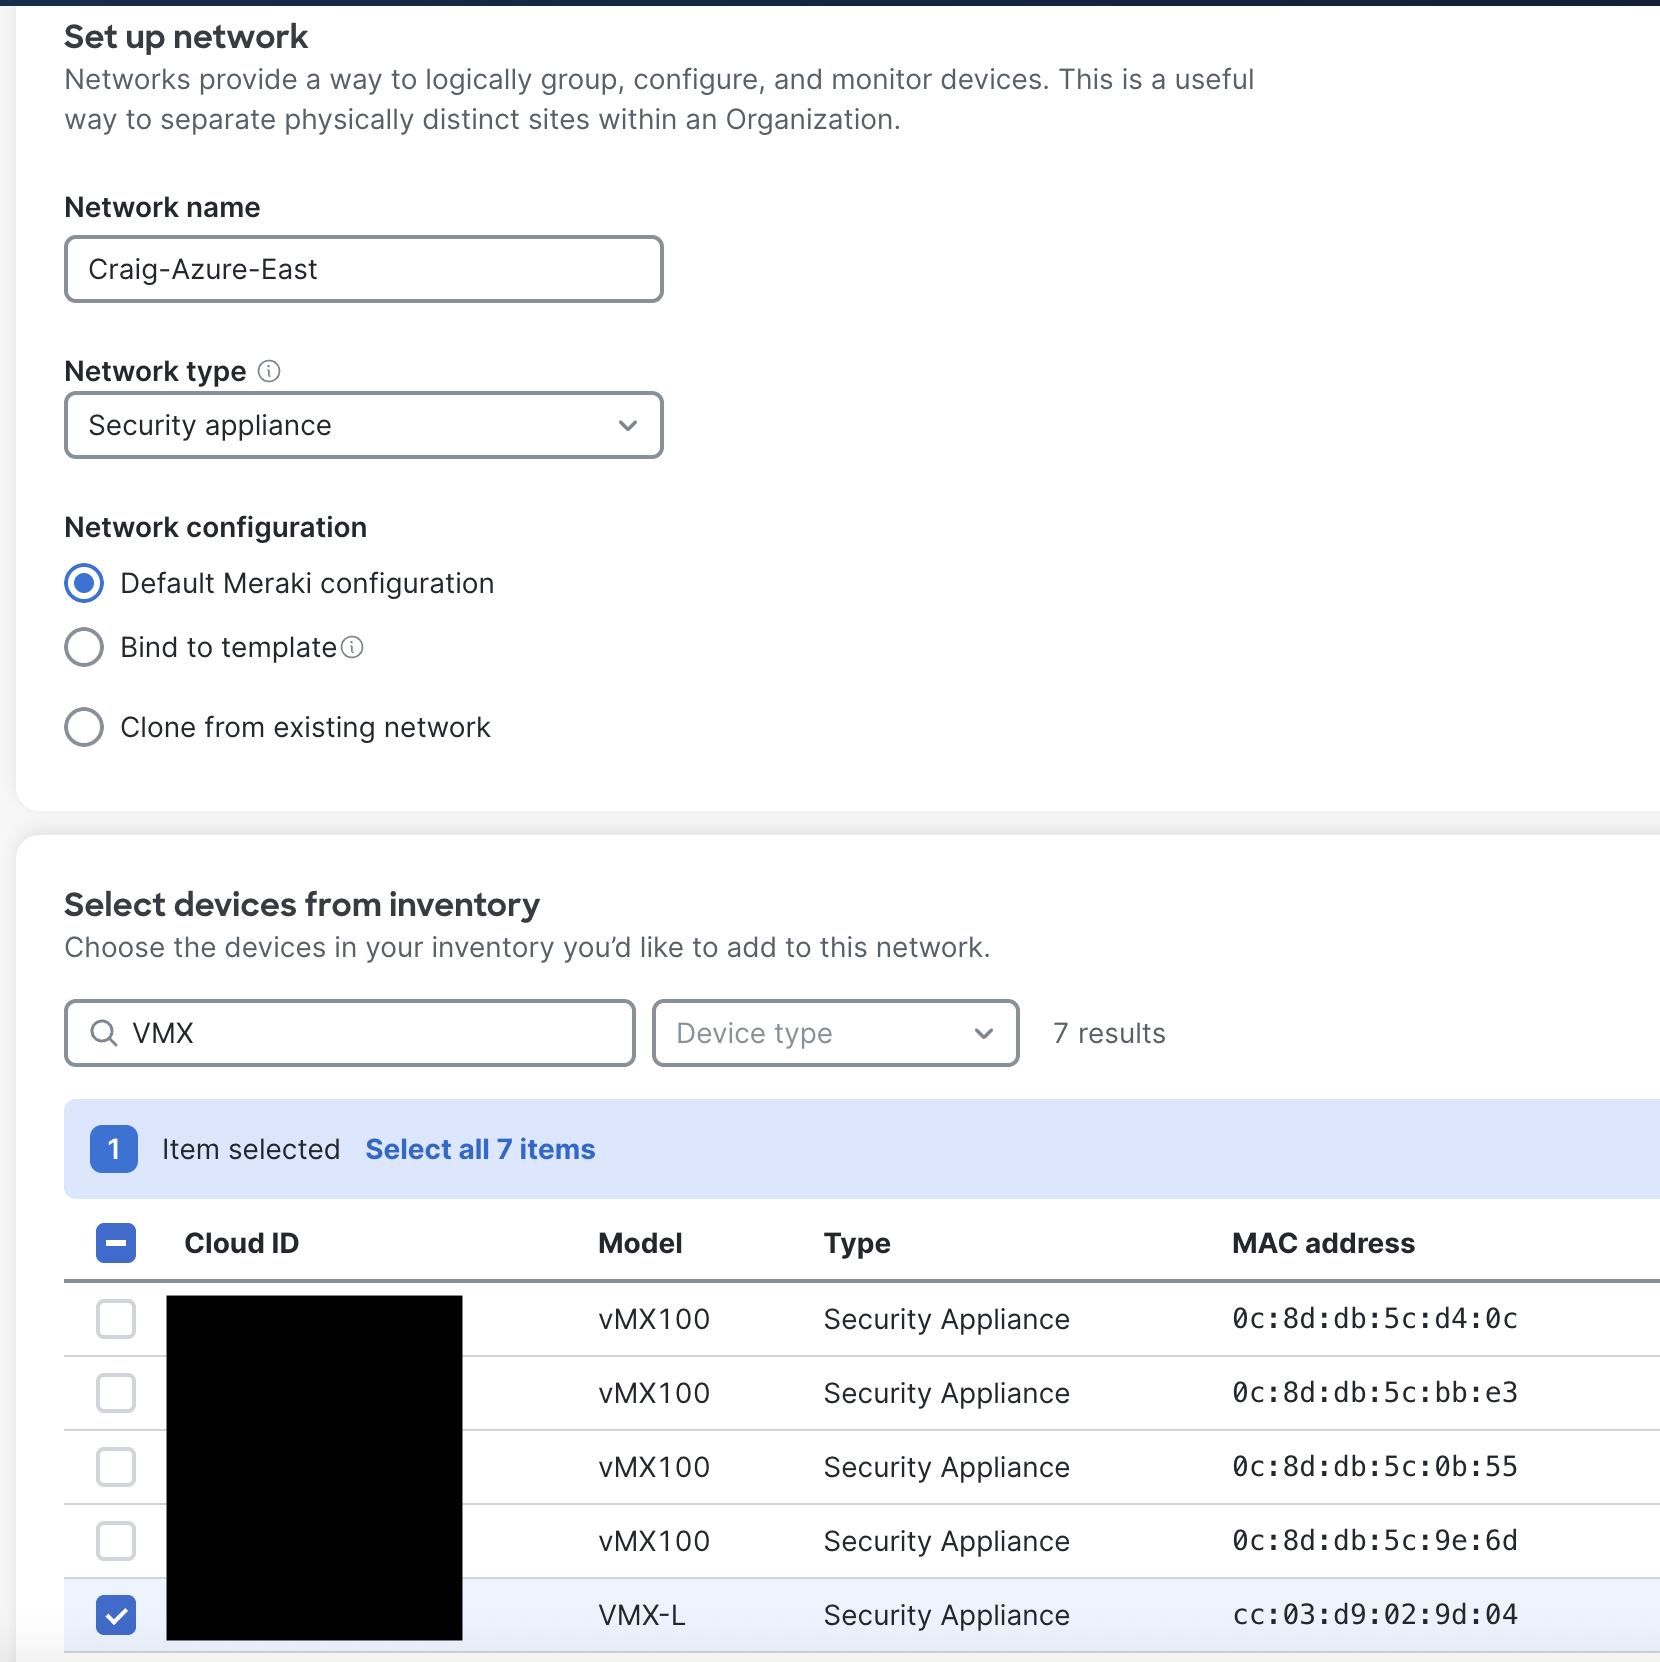
Go into your Organzation in the Meraki Dashboard and create a new Network to house the vMX, choosing Security Appliance for the network type. Select a vMX device from inventory.
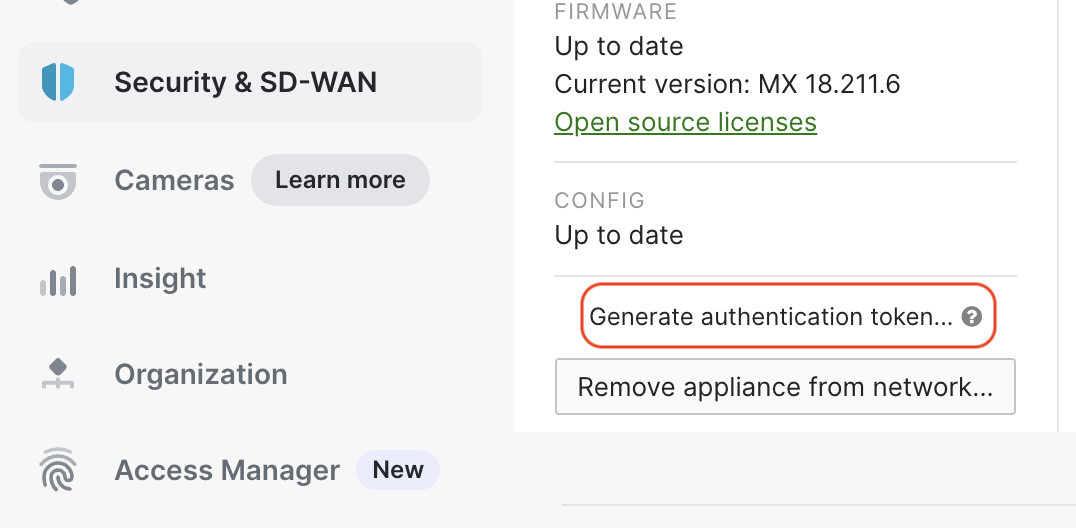
One of the inputs needed when deploying a vMX from the Azure Marketplace is a token. This token is generated via a button within the Meraki Dashboard from the Network in which the vMX will reside.
Deploy the vMX in Azure#
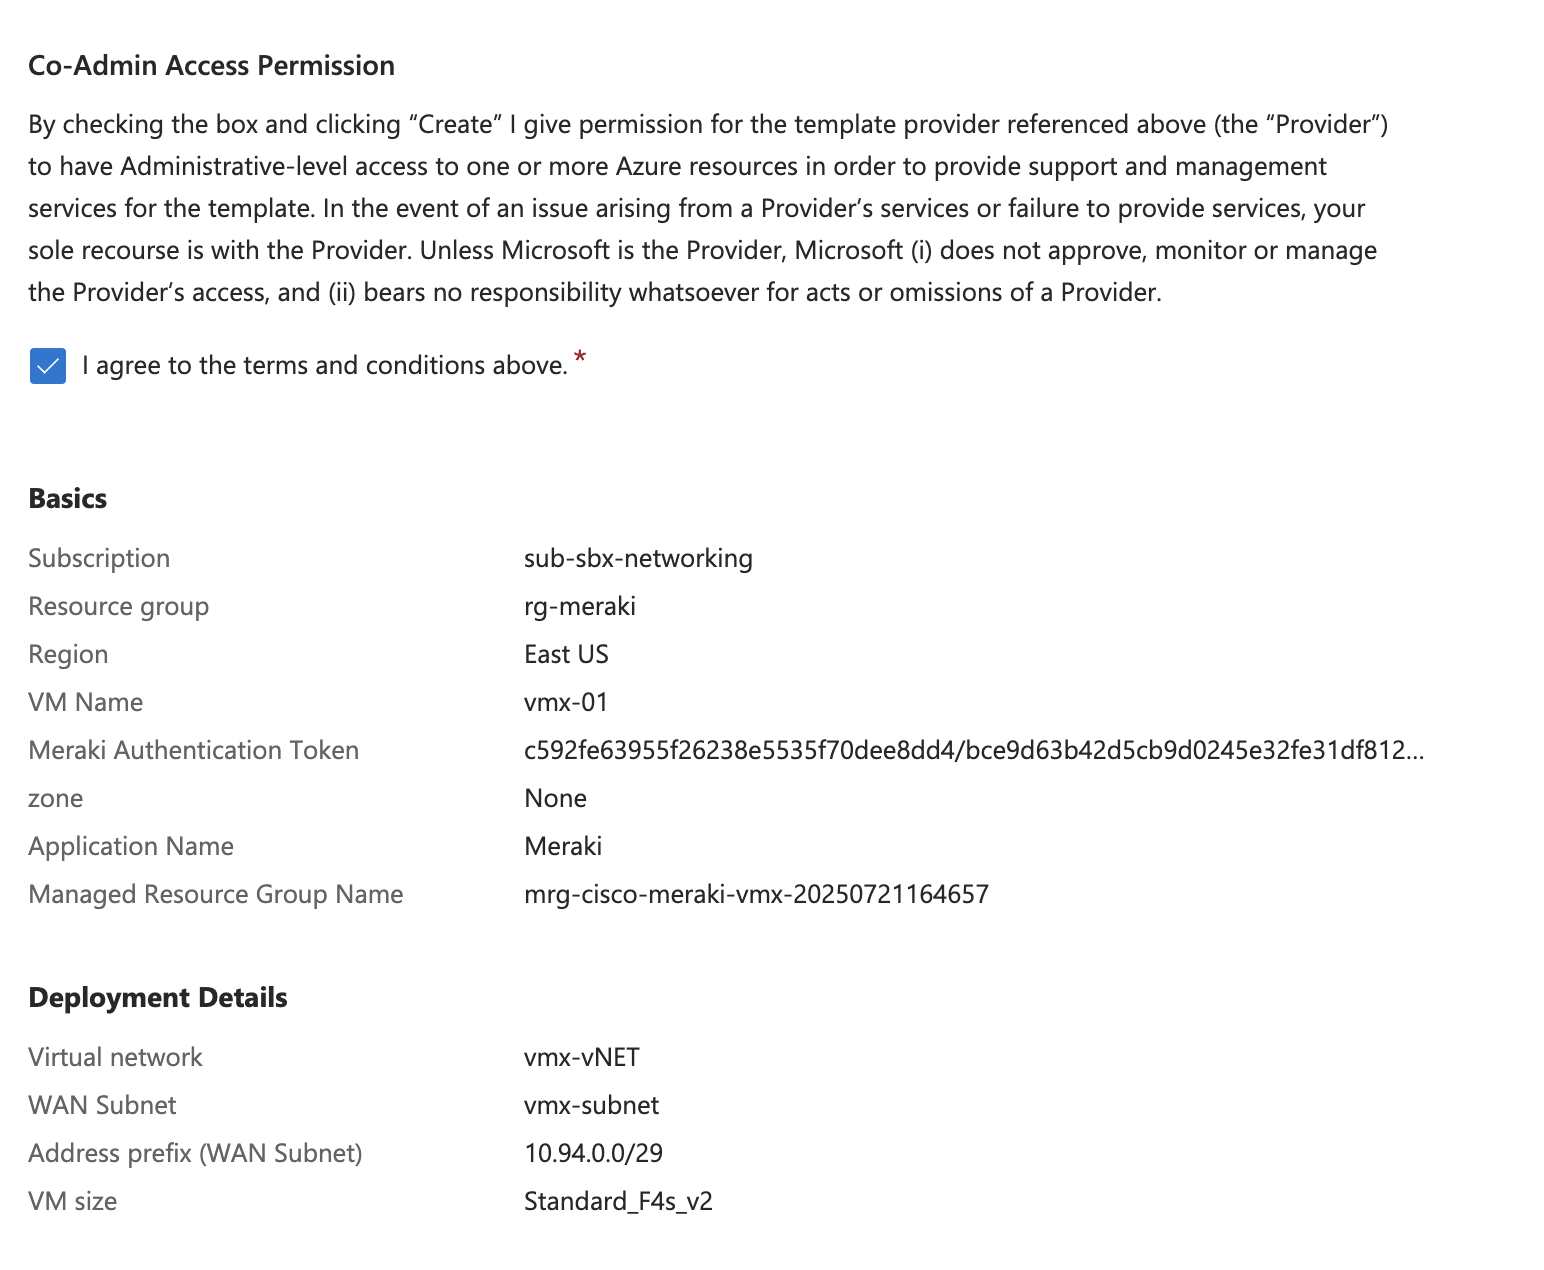
Deploy vMX from Marketplace#
With the token in hand, search the Martplace for Meraki and use the deployment wizard. The vMX will live in its own small vNet. I used 10.94.0.0/24 for the vNet and 10.94.0.0.29 for the subnet the vMX resides in.
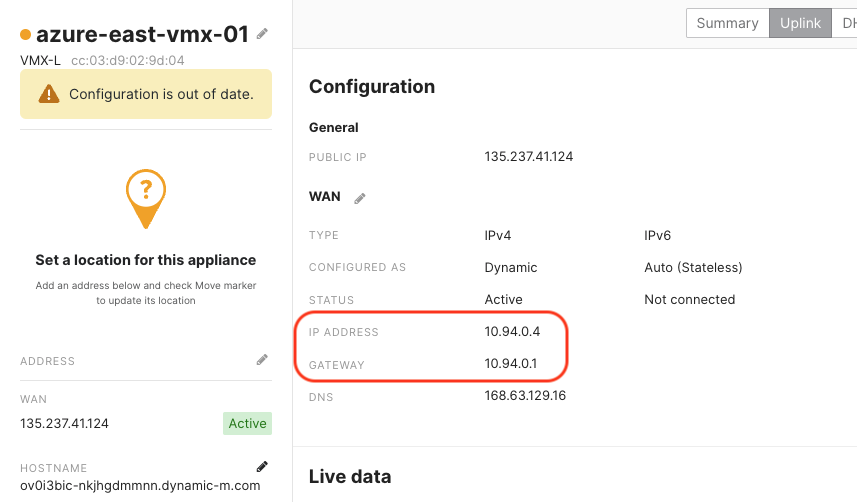
The vMX should come online in 7-10 minutes. Recall that this vMX is deployed in one-armed concentrator mode, so it has a single interface which both terminates AutoVPN, and faces inward for BGP peering toward vWAN. This interface has an assigned RFC1918 private IP of 172.16.0.4, and is also Source NATted to a global IP of 135.237.41.124.
The private IP will be used for BGP peering, and the public IP is what AutoVPN tunnels will be built to. I’ll also need the gateway when settings up the peers.
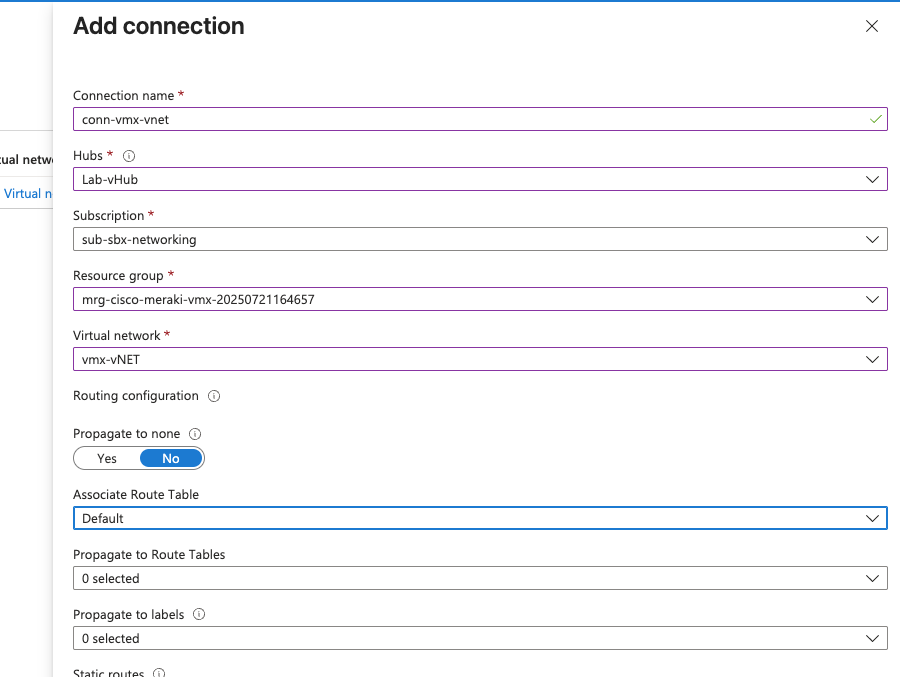
Connect vMX vNet to vWAN vHub#
Once the vHub is done creating, add a connection between the new vNet that the vMX lives in, and the vHub. Notice we must select the Meraki Managed Resource Group which got created during the vMX deployment in order to get access to the corect vNet in the drop-down.
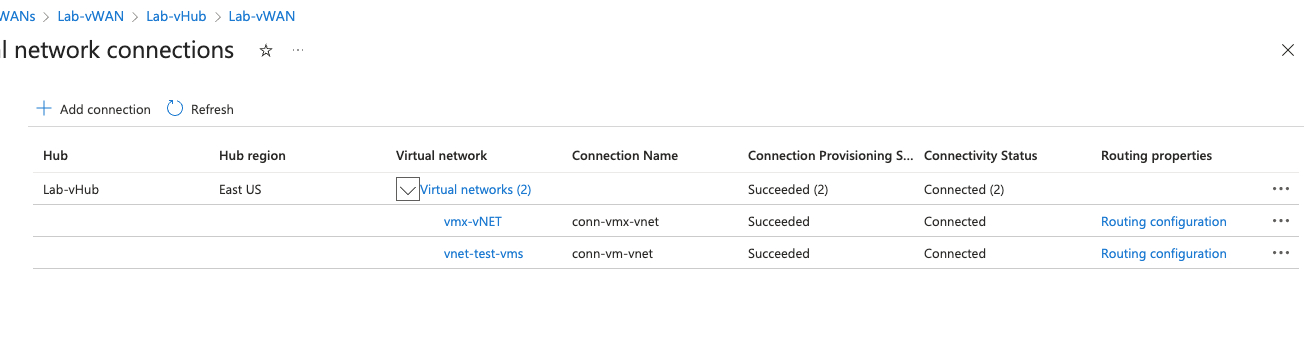
Below confirms both vNets I need are connected to the vHub.
Azure BGP Configuration#
Azure has set aside 2 address from the vWAN prefix I picked for BGP peering. It will also select AS 65515 for itself by default. This will be used later in the Meraki Dashboard config.

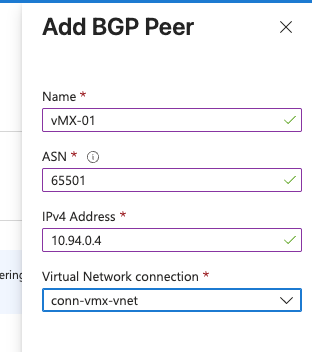
Add vMX eBGP Peer#
Add a single peer for the single vMX using its private IP that we took note of before, and the ASN of choice (65501).
Meraki Dashboard BGP Configuration#
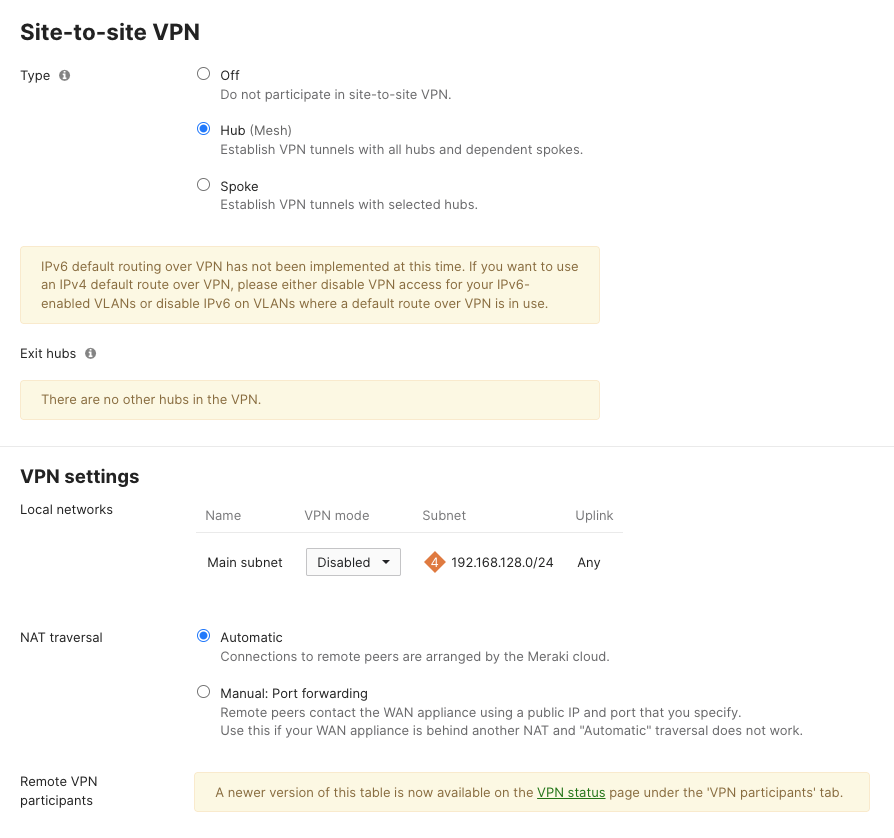
First set this vMX device to be a VPN hub.
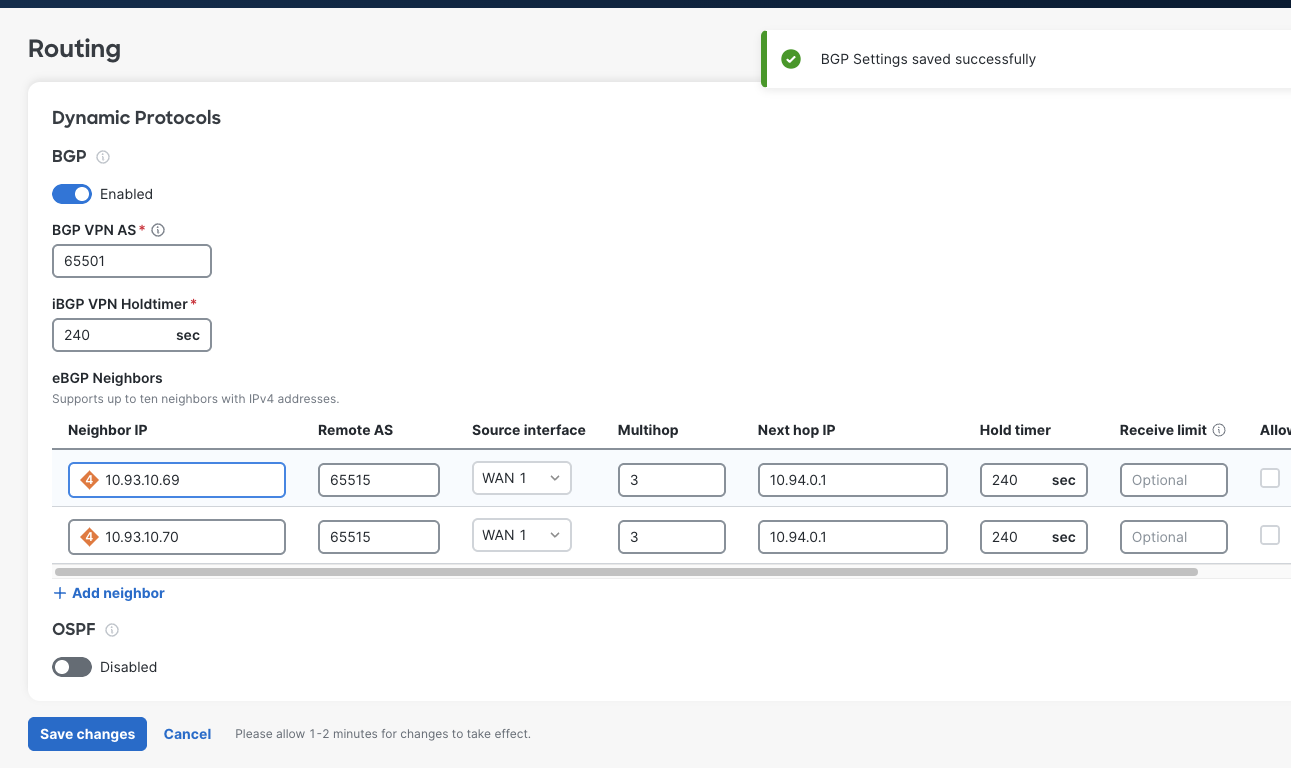
Next, head over to the Routing config section. Enable BGP and add 2 neighbors, one for each of the vWAN peering addresses found before. It is necessary to enable BGP multi-hop since the vMX interface is not directly connected to the vWAN peering entity. If this isn’t set, the peers will never come up. I used the multi-hop value of 3, but 2 might be sufficient if you care to test it.
BGP Peering Confirmation#
Give the peers at least 5 minutes before taking any troubleshooting steps. In my testing, both peers came up in about 2 minutes. I started receiving 10.93.10.0/23 and 10.95.0.0/24 inbound on the vMX from Azure, which is promising.
Meraki Branch Setup#
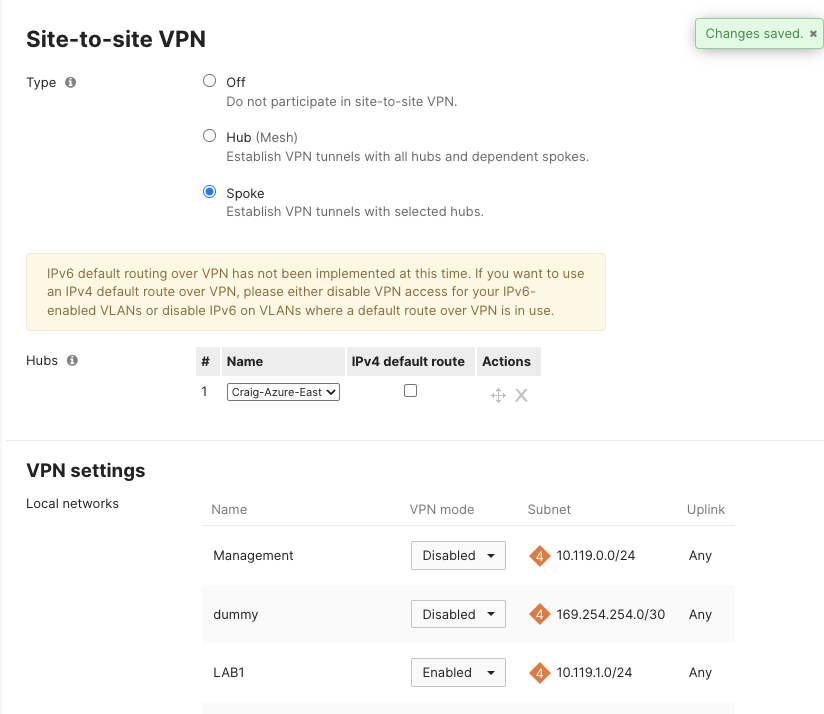
Now I’ll configure a test Branch to use the new vMX as an AutoVPN hub and advertise one of its local VLAN prefixes via AutoVPN. This prefix should make its way into the routing table in Azure if things go well.
Validation#
Azure Side#
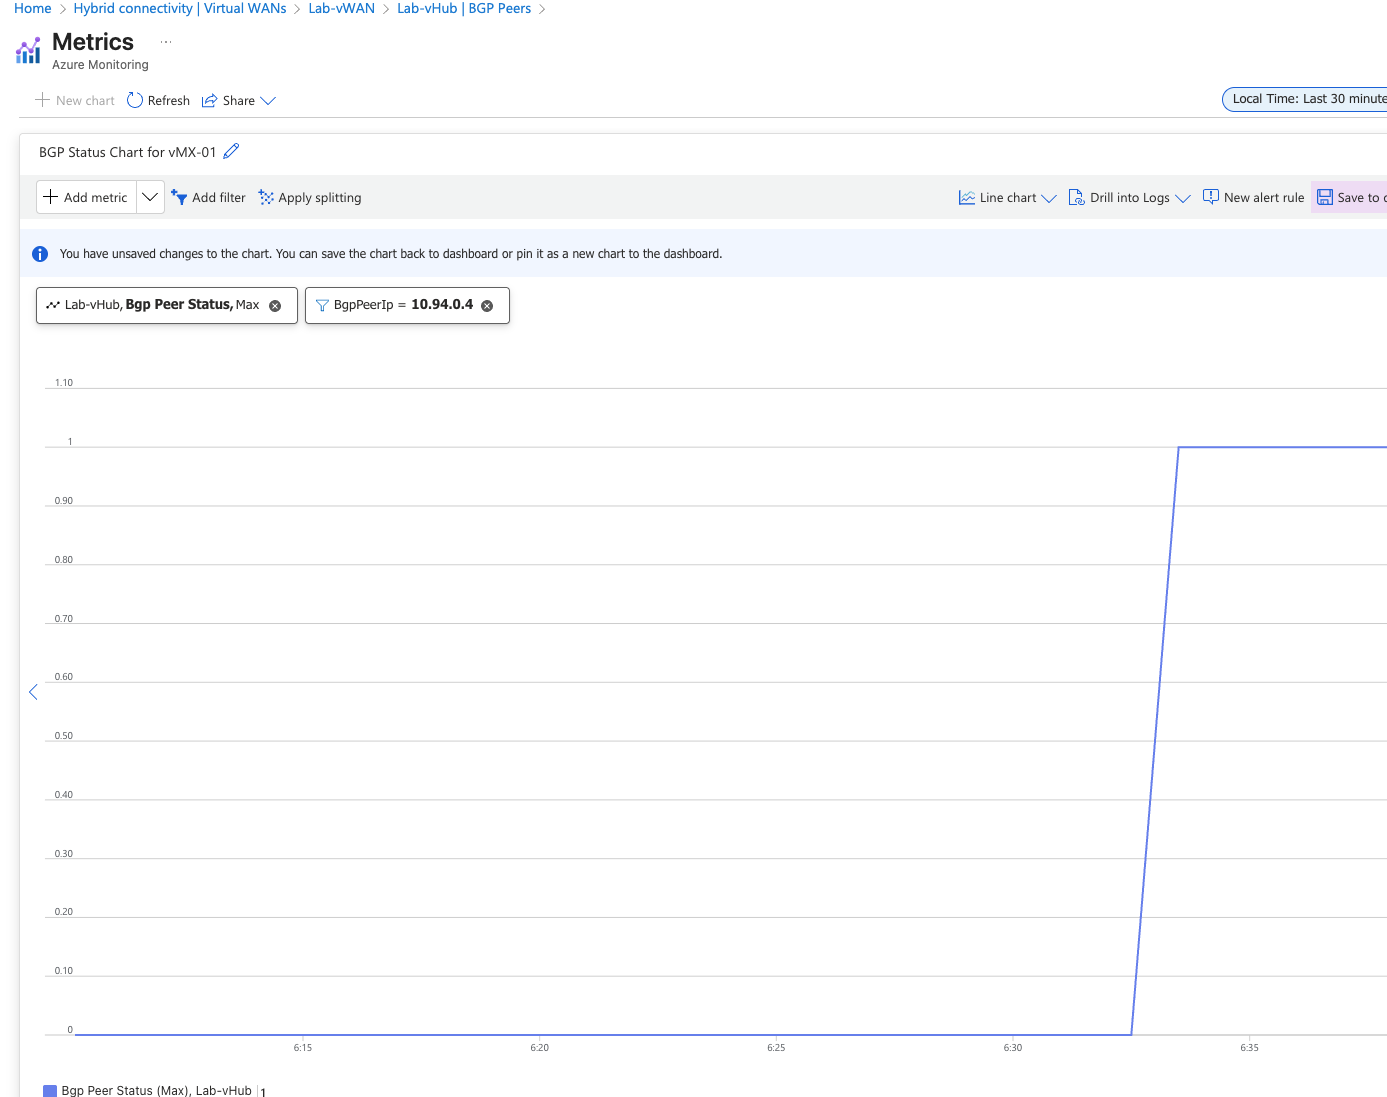
Peer Status from Azure#
Looking from Azure, it’s clear to see when it was the vMX eBGP peer come up.
Azure Route Tables#
Here’s a look at the vHub effective routes once AutoVPN is up. Notice that the 10.119.1.0/24 prefix is being learned. This is an SVI from the test branch. Azure identifies that it learned this via BGP AS 65501 and the next hop is the vMX. Looks good.
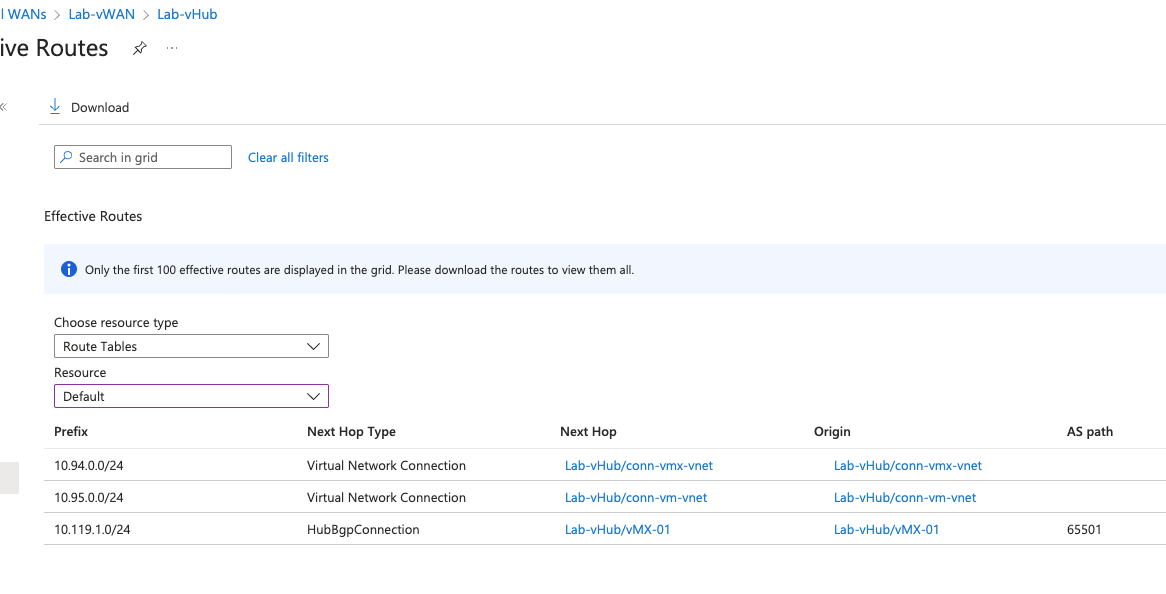
Looking further, I check the effective routes from the perspective of my Azure test VM. Again, the test branch prefix is there and the next-hop is the one of the vHub peers.

Meraki Dashboard Side#
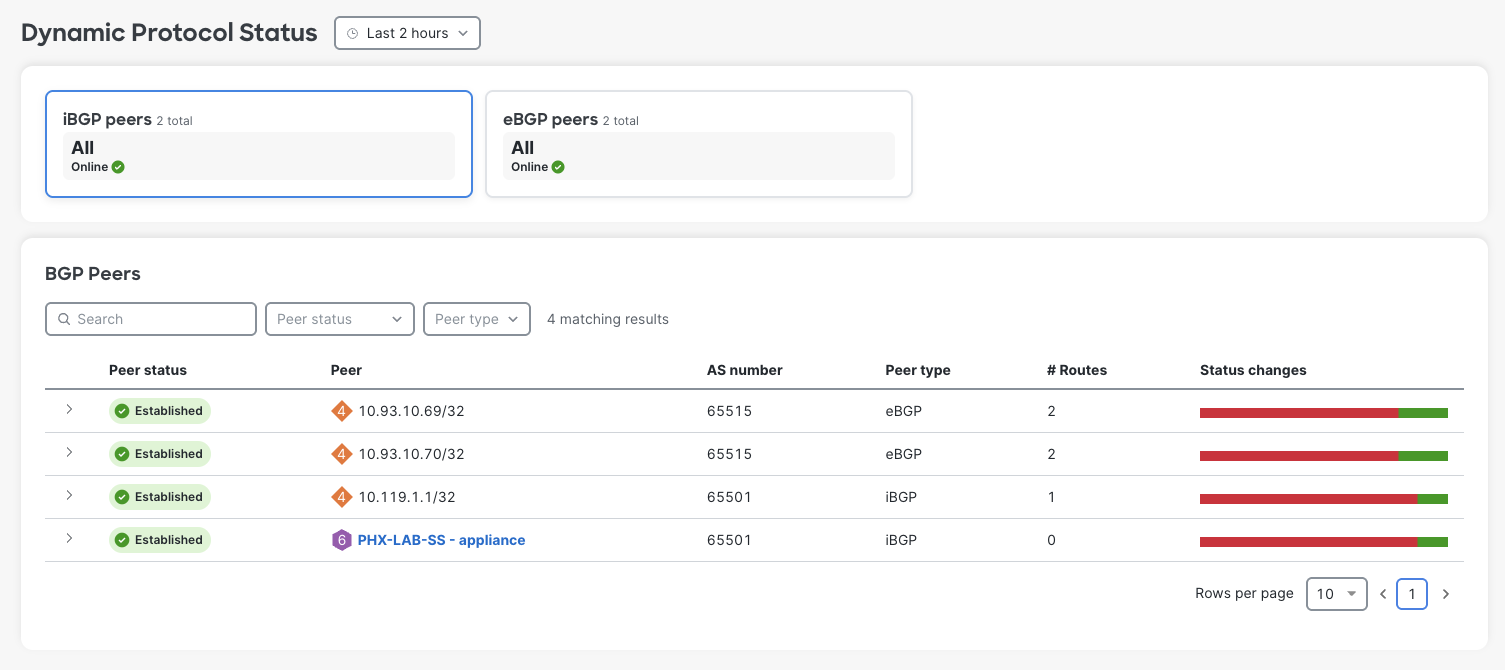
Peer Status from vMX#
Now that there is a branch building AutoVPN to the vMX, the vMX lists additional iBGP peers. These were not explictly configured, but AutoVPN does this behind the scenes.
Notice the # Routes column. This gives a good indication that some NLRI have actually been exchanged between vWAN and the vMX.
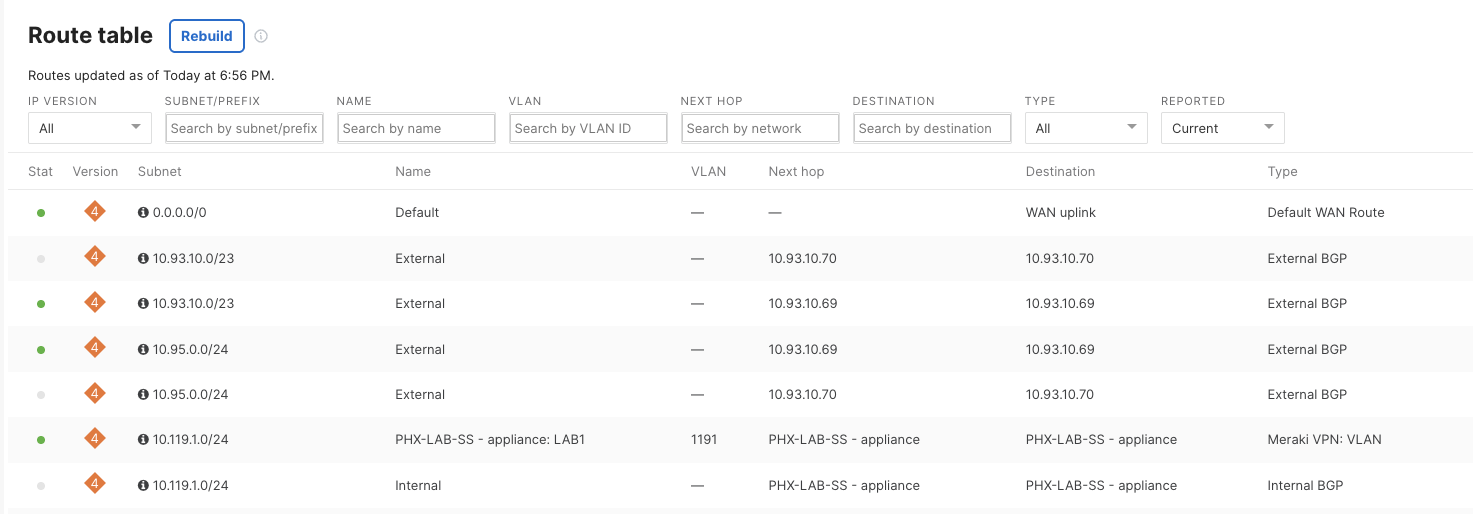
vMX Route Table#
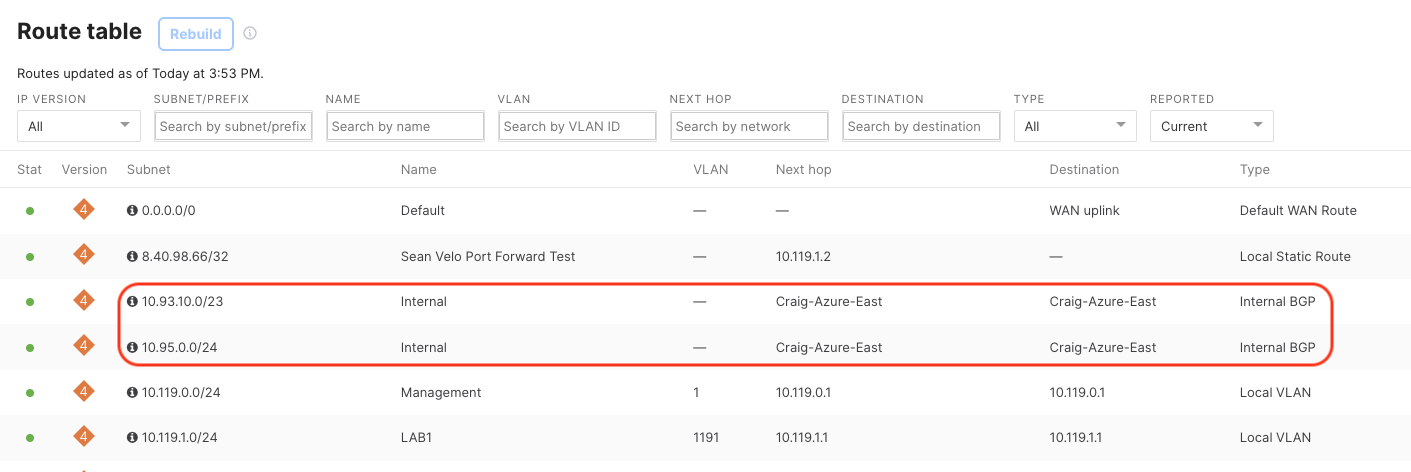
Remote Branch Route Table#
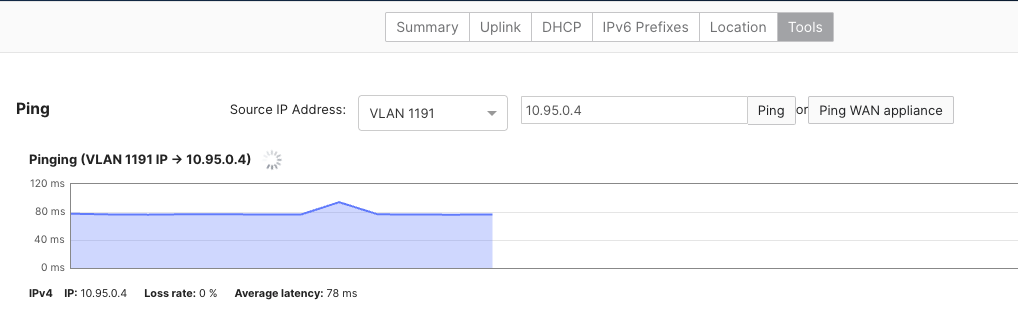
Test ICMP from Meraki Branch#
Finally, ICMP is used to demonstrate reachabilty from the test branch site SVI to the test Ubuntu workload in Azure.
Conclusion#
At this point, we’re all set to add new branches into AutoVPN and get forwarding working with Azure. In the next part of the series, I’ll demonstrate what migrating branches from IPSEC entails.