Configuring Policy-based VPN with ASA & Azure VWAN#
Overview#
In another blog series, I covered the foundational differences between route-based and policy-based VPNs. In short, policy-based is the older way which relied on specific traffic selectors and matching interesting traffic with an ACL, and route-based is the more modern way which uses virtual interfaces and familiar routing table entries to direct traffic across tunnels. However, route-based support is not available on all platforms so we still deal with policy-based VPNs frequently in practice, especially with B2B connections where different parties control either end.
Azure supports both methods, but one caveat I discovered the hard way is that Azure only supports NATting across route-based VPNs. In this post, I’ll demonstrate how to configure a typical policy-based VPN between an ASAv and Azure.
ASAv Side#
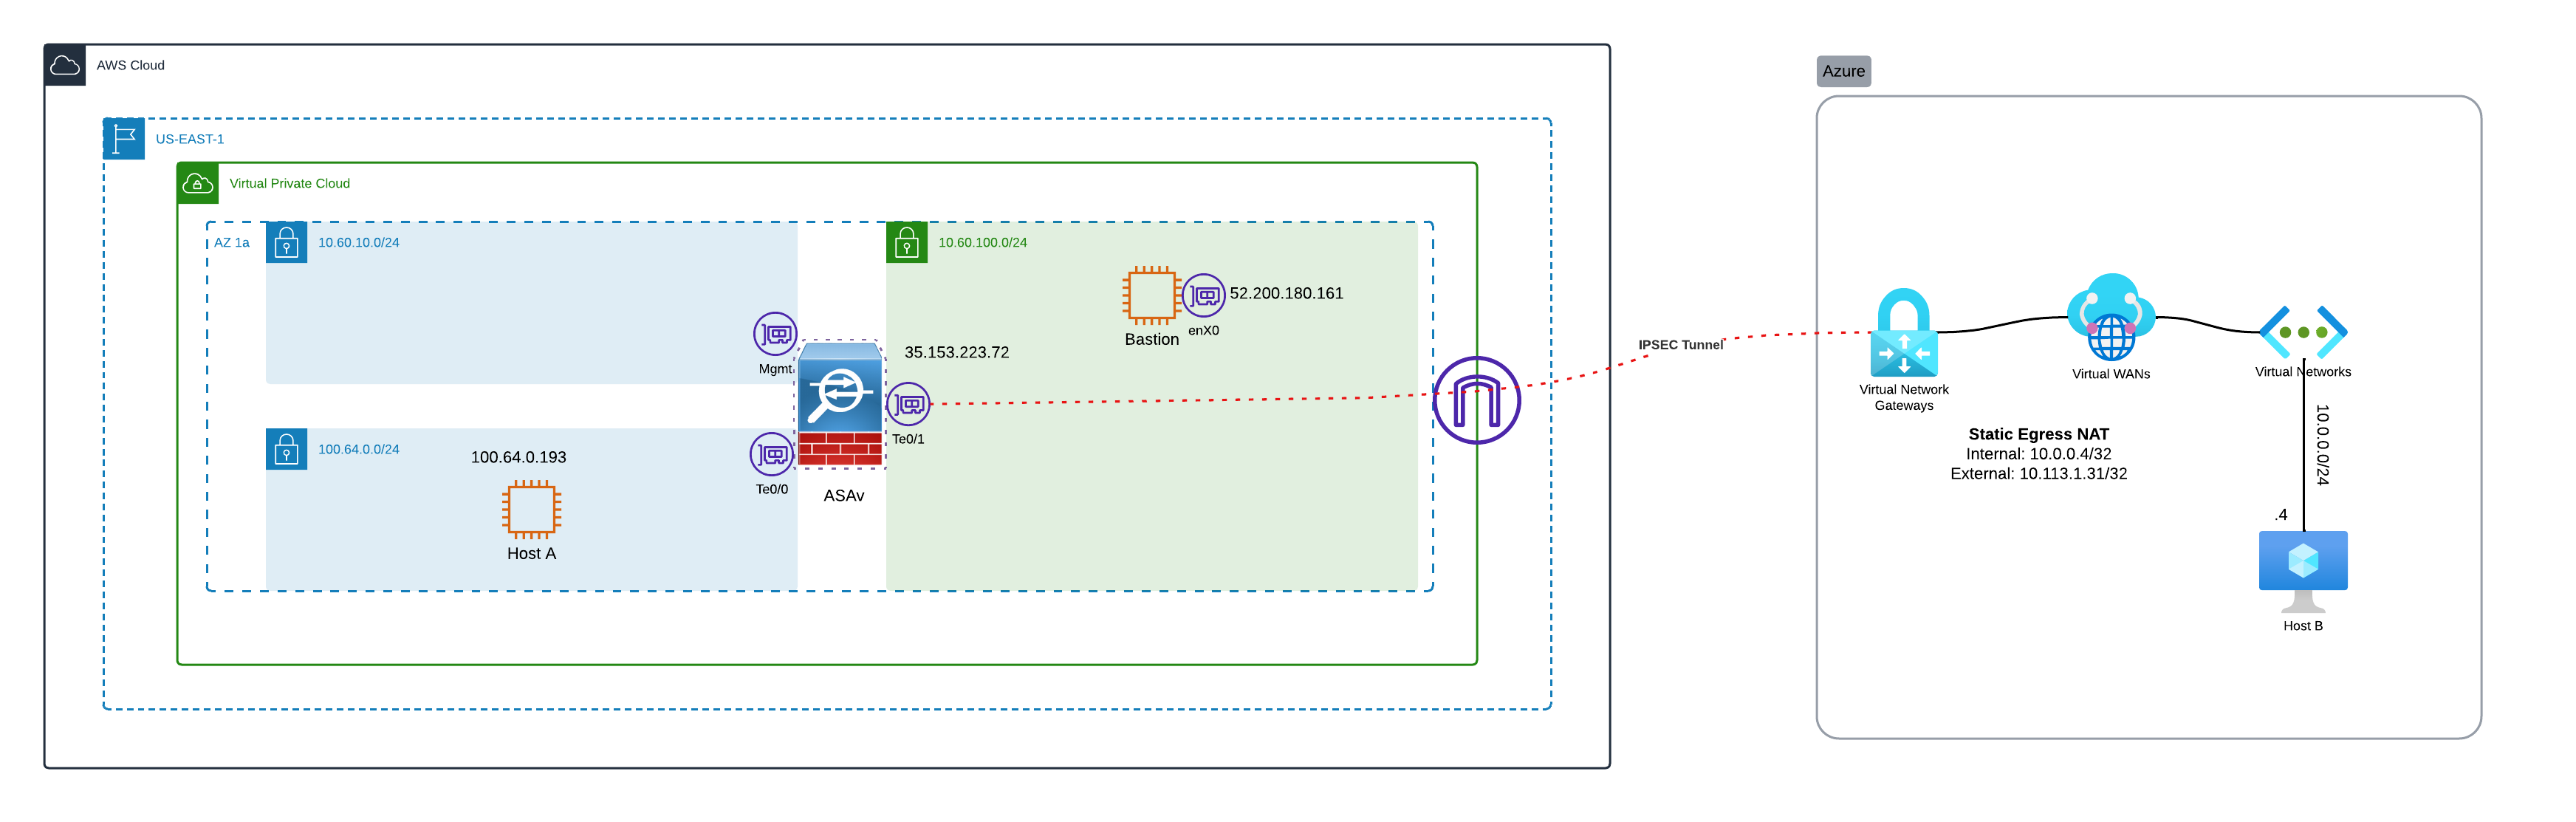
In my lab scenario, the ASA I used for one side of the tunnel happens to be an ASAv, and happens to reside in AWS. Read how I deploy these in another post. This has little bearing on the design, and a physical ASA or ASAv running on any hypervisor will work similarly. This is just what I had handy, and I wanted to point it out to avoid any confusion. If this is confusing, forget that any AWS network constructs are involved here, and the big picture becomes an ASA with a workload behind it, tunneling to Azure which has another workload.
More Detailed True Picture
If you are using ASAv on AWS, make sure to understand the things ASAv on AWS does not support:
VPN Configuration#
VPN configuration is a 6 step process, which can be thought of as two parts. Steps 1 & 2 are referred to as the “Phase 1” part. Here is where we define how the tunnel will be protected with IKE. Steps 3 – 6 are referred to as the “Phase 2” part, where we define how data in the tunnel is protected with IPSEC.
Looking at examples can be confusing because there are several permutations that one might find. IOS routers and ASAs will always have slightly different syntax. I’ll try to point out where these differences might pop up.
Phase 1 Part#
Step 1 – Define Phase 1 IKE policy#
IKEv1 and IKEv2 have different syntax. IKEv1 should be considered deprecated at this point and not used, but it still comes up regularly because… inertia. We all should be using IKEv2.
! IKEv2 crypto policy example
crypto ikev2 policy 1
! encryption
 encryption aes-256
 integrity sha256
 lifetime seconds 86400
! Diffie-Hellman group
 group 20
! Tie IKEv2 to the firewall outside interface
crypto ikev2 enable outside
!
group-policy DfltGrpPolicy attributes
 vpn-tunnel-protocol ikev2
Note about the integrity command: when using AES-GCM: “An authenticated encryption algorithm provides a combined functionality of encryption and integrity. Such algorithms are called combined mode algorithms. The Support of AES-GCM as an IKEv2 Cipher on IOS feature provides the use of authenticated encryption algorithms for encrypted messages in IKEv2 protocol by adding the Advanced Encryption Standard in Galois/Counter Mode (AES-GCM). AES-GCM supports the key size of 128- and 256-bits—AES-GCM-128 and AES-GCM-256. If AES-GCM is the only encryption algorithm, integrity algorithms cannot be added to the proposal.”
Step 2 – Define pre-shared key password (or certificate)#
Certificate authentication is possible, but in this case I’m just using a pre-shared key. IKEv1 supports only symmetric passwords, while IKEv2 does support asymmetric passwords. This means you can use a separate PSK for each direction of the tunnel, but I don’t do it because I think it only creates confusion.
tunnel-group <remote-peer-ip> type ipsec-l2l
tunnel-group <remote-peer-ip> ipsec-attributes
  ikev2 remote-authentication pre-shared-key <PSK here>
  ikev2 local-authentication pre-shared-key <PSK here>
Phase 2 Part#
Step 3 – Define Phase 2 IPSEC policy#
 crypto ipsec ikev2 ipsec-proposal AES256
  protocol esp encryption aes-256
  protocol esp integrity sha-256
Step 4 – Define triggering traffic#
Often referred to as “interesting traffic”. There are multiple methods to define this. If you only have a single subnet on the local and remote side, you can use something simple.
! Simple option
access-list acl-VPN-Azure extended permit ip <local subnet> <local mask> <remote subnet> <remote mask>
If you have many subnets on either side, or want to plan for such an occurrence, have a look at the bonus section near the end on how to use object-groups to define things before referring to them in an ACL.
Step 5 – Wrapping up Step 1 – 4 config in a container#
The container used for this purpose is known as a crypto map.
Note: I don’t have remote-peer-ip yet at this stage because it comes from Azure later
! Refer to previously create ACL which defines interesting traffic
crypto map outside_map 100 match address <ACL name>
crypto map outside_map 100 set peer <remote-peer-ip>
crypto map outside_map 100 set ikev2 ipsec-proposal AES256
crypto map outside_map 100 set security-association lifetime seconds 28800
Step 6 - Apply crypto map to outgoing interface#
! Attaching to the interface nameif'd outside
crypto map outside_map interface outside
! Assuming this ASA is already performing NAT/PAT
! I do make use of the object groups in this example
nat (inside,outside) source static obj-Local-Nets obj-Local-Nets destination static obj-grp-VPN-Azure-Remote-Nets obj-grp-VPN-Azure-Remote-Nets no-proxy-arp route-lookup
Azure Side#
Azure configures differently than the ASA, and is considerably slower to work with. There are six basic parts which the Azure docs cover.
- Azure VPN Gateway creation
- VPN site creation
- VPN site Hub connection
- Azure config retrieval
- Local Network Gateway creation
- Create connections
Frankly, I’m confused by these docs. The process they describe has steps 5 & 6 that I have never implemented, and still resulted in working VPNs. Their steps run you all over the Azure portal in a less than efficient manner. There are also points where parameters seem to be tracked redundantly. This is not very DRY of Azure, and honestly confusing about which value actually matters.
My only guess is that this is a result of things being in transitional states. Leave a comment if you have any insight into the situation.
1. VPN Gateway Creation#
I’m not going to cover this step. I am starting with vWAN setup which was already configured with a Virtual Gateway for terminating IPSEC. I may cover this portion in an automated vWAN deployment post later.
2. VPN Site Connection#
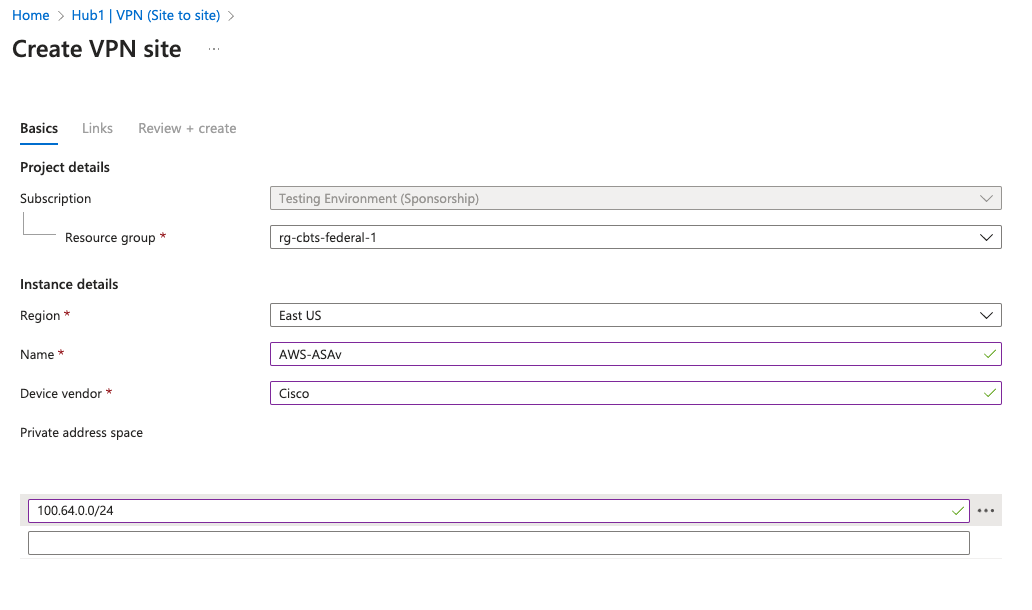
In this step, I create a VPN Site from my VWAN Hub’s menu context.

I specify the Subscription, Resource Group, Region, Name and Vendor. Since I’m not configuring BGP in this case, I must add the subnet which is behind this VPN Site.
Note: Vendor serves no technical function that I know of, it’s just a label.
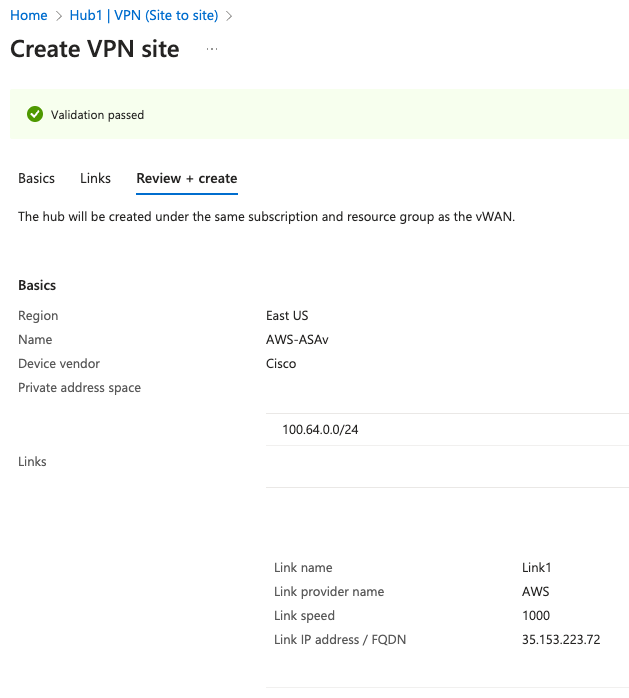
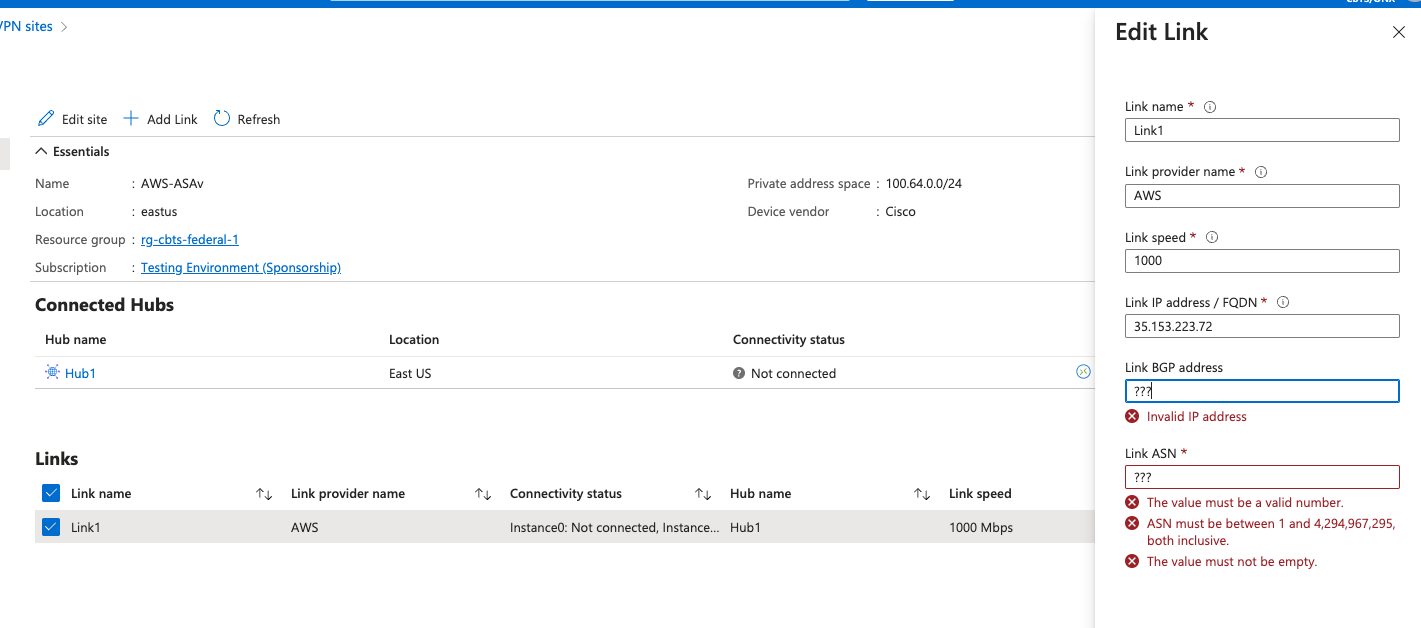
Next I configure a Link for this VPN Site, which is basically the globally routable address that tunnels should be initiated towards.
Note: I’ve been unable to find any documentation about whether there is a technical function for Link Speed. Kind of interesting that it’s not even obvious what units are assumed. I assume Mbps.
Kick off this Create and wait a few minutes, or longer.
3. VPN Site Hub Connection#
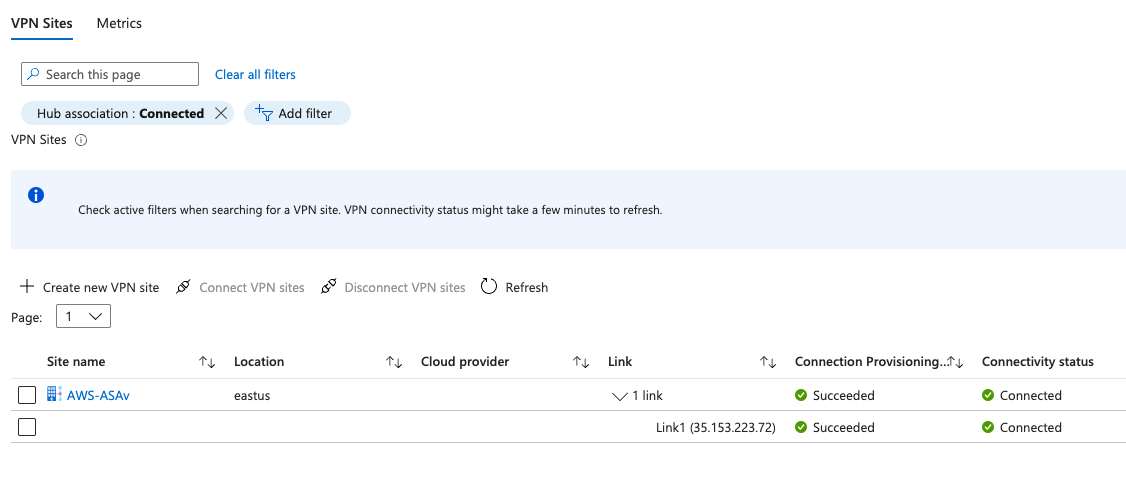
This step is critical in my process, yet doesn’t get good coverage in the Azure docs. Again, from the VWAN Hub context, first remove the Filter which only shows Connected VPN Sites. I don’t understand this choice of a default, since obviously the brand new VPN Site is not yet connected.
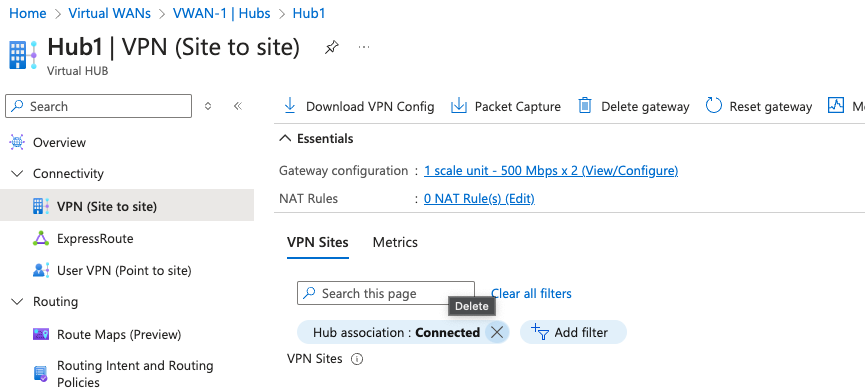
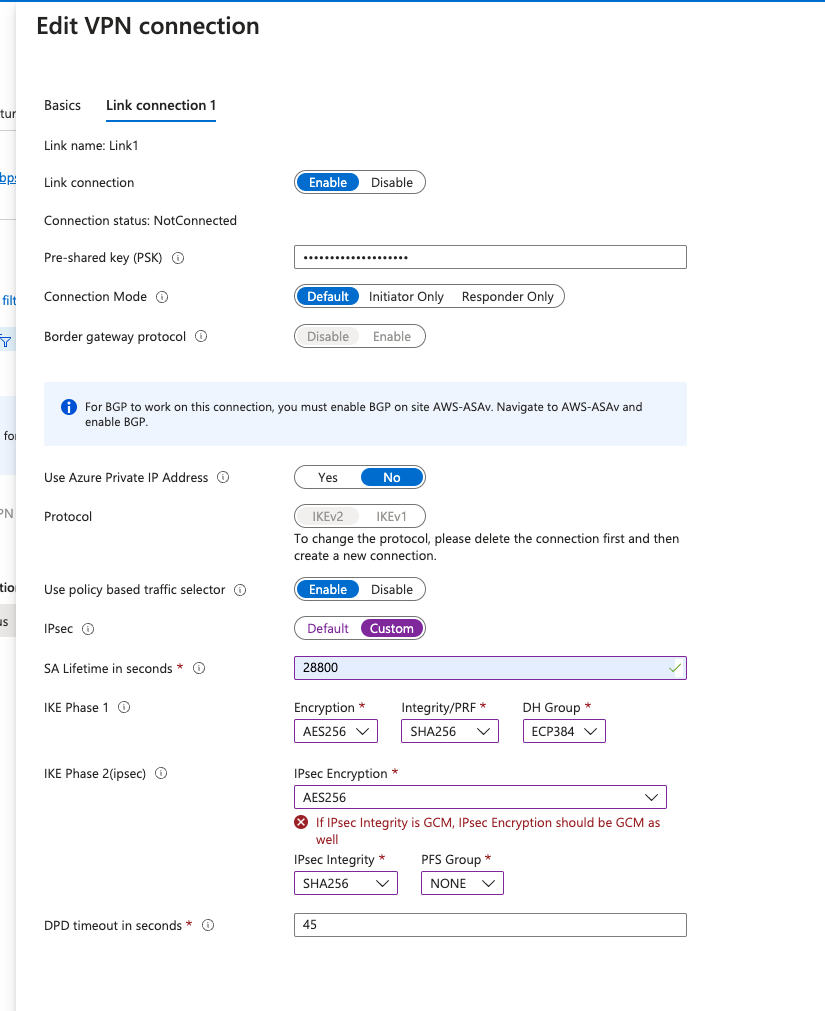
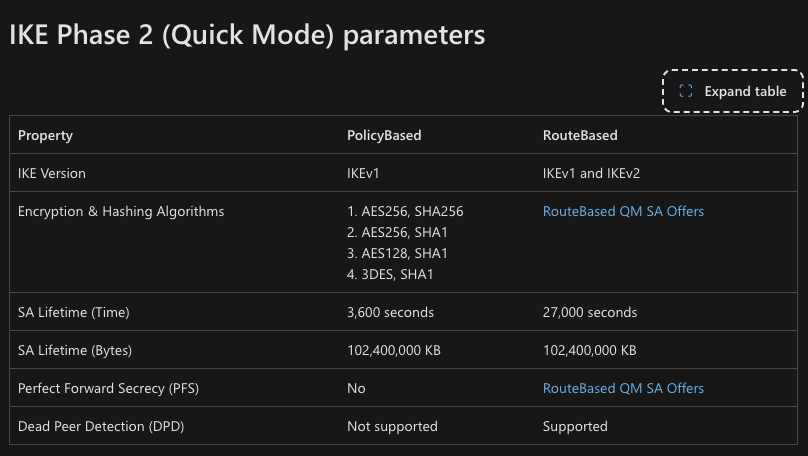
With that filter removed, the new VPN Site is visible. Select it and choose Connect VPN Sites. I’ve chosen a pre shared key and IKEv2, and set the IPSec properties from Default to Custom, along with the Phase 1 and Phase 2 settings I want. This is another documentation curiosity since I don’t see clearly what Defaults are for an IKEv2 policy-based VPN. It looks to me like they covered policy-based IKEv1, and route-based IKEv1 and IKEv2, but left policy-based IKEv2 out.
This action took around 6 minutes to report completed.
4. Azure Config Retrieval#
Next I Download the Site-to-Site VPN Configuration from the VWAN context. This step isn’t strictly necessary since I’m the one who just provided the inputs for most of the parameters in this JSON file. The parameters I didn’t provide are the public addresses for the Azure VGW, but those are also retrievable in other ways. In any event, we do need them for the ASAv side of the tunnel configuration.
Note: You will need an Azure Storage Account available to store this file in prior to download.
5. Local Network Gateway Creation#
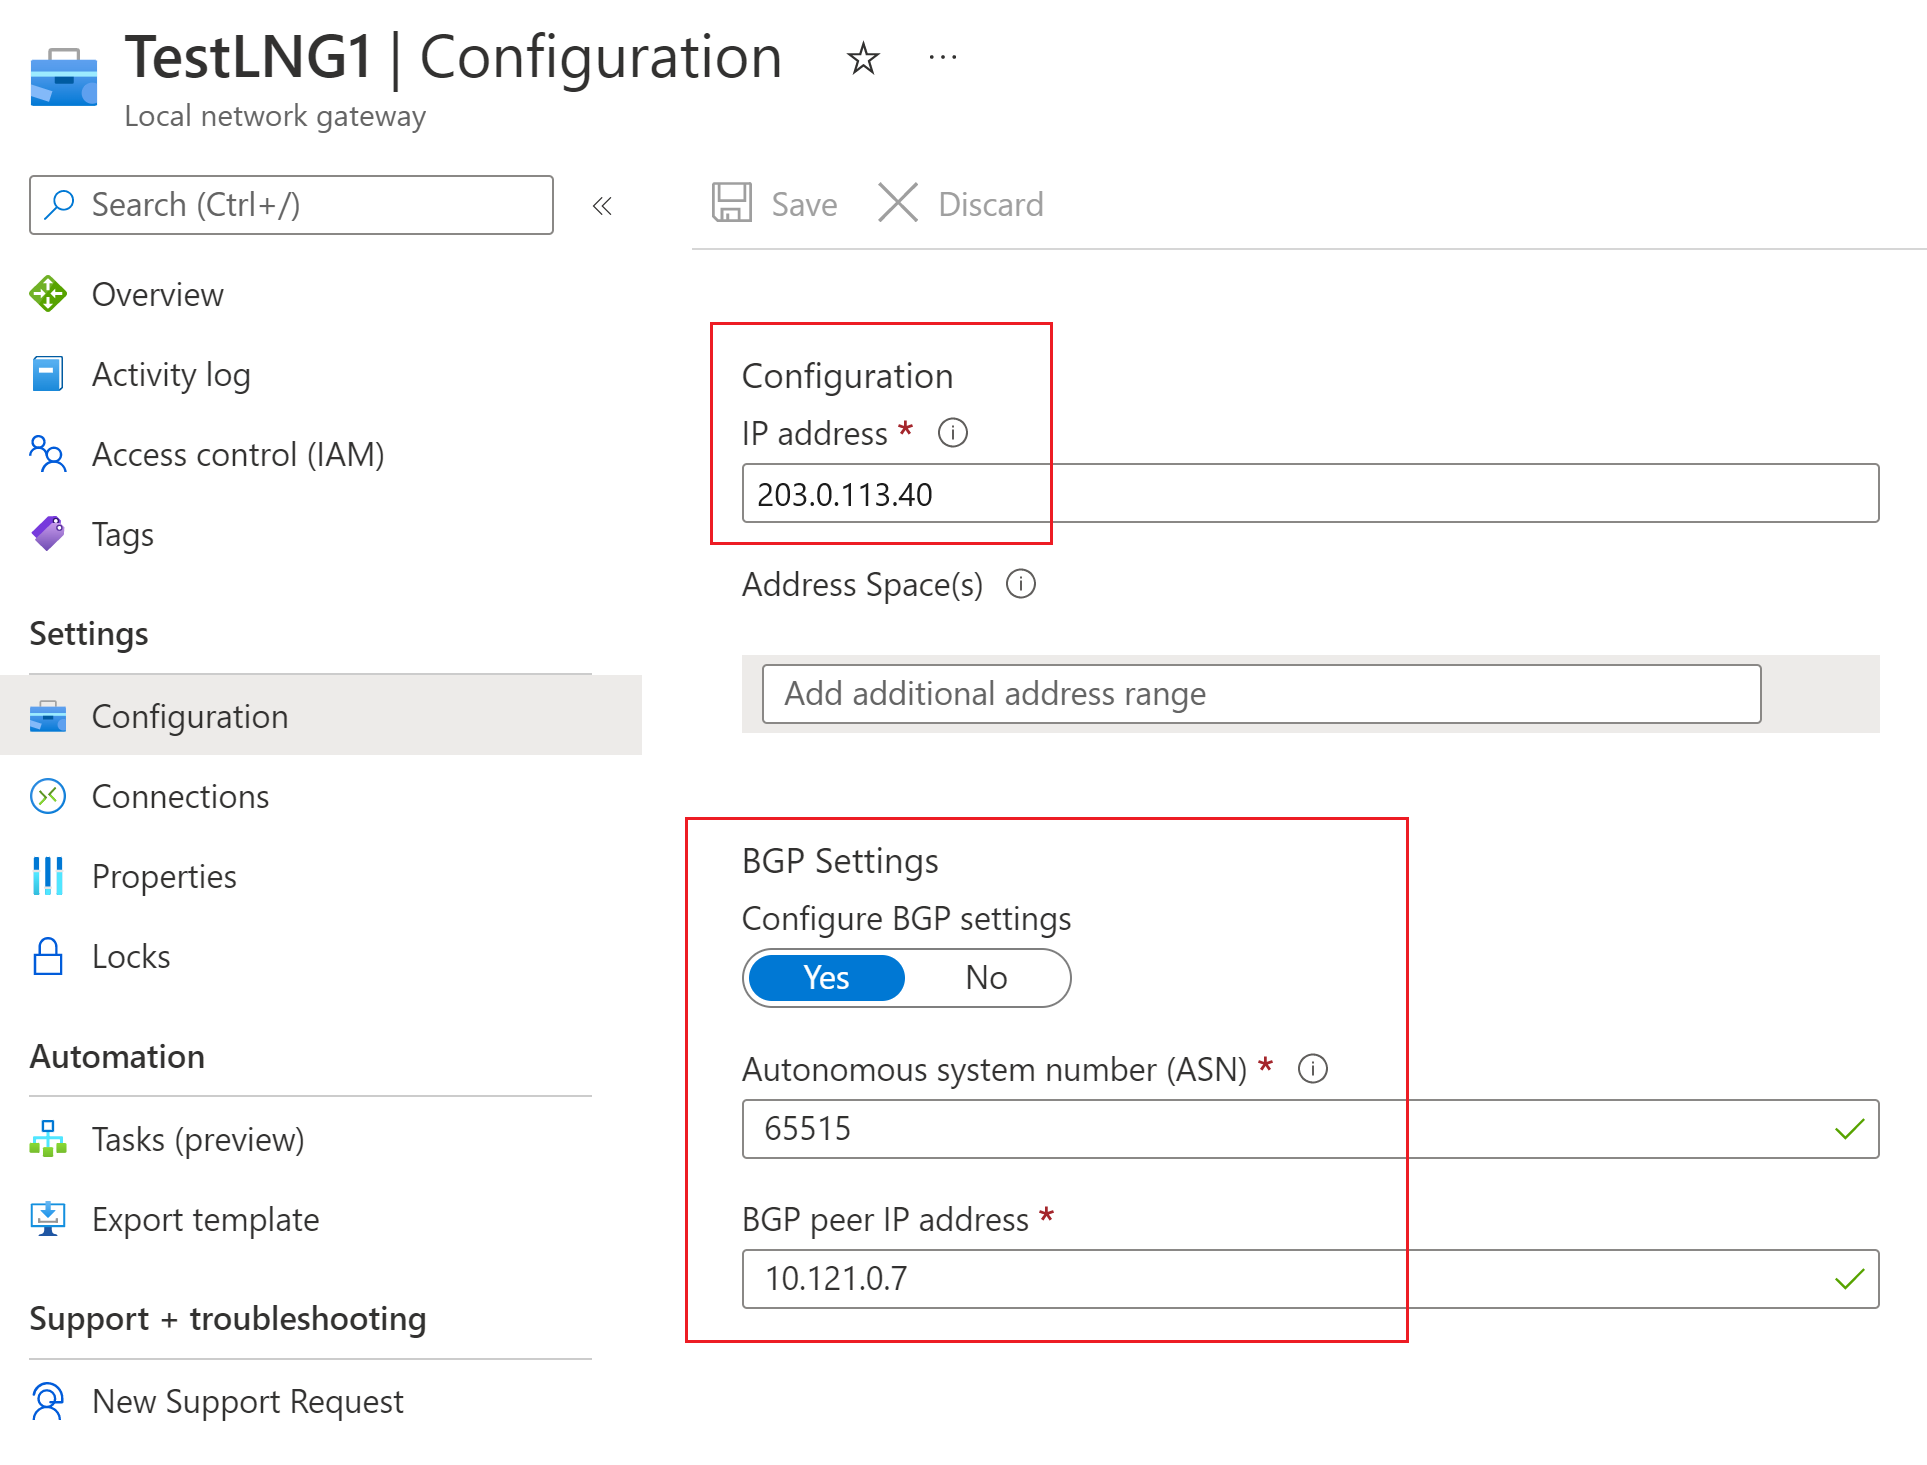
This next documented step is one I completely skip. An Azure Local network Gateway seems to be just a logical representation of the far side device of an IPSEC tunnel. I really don’t understand the purpose of them, since they only seem to track redundant parameters that are created elsewhere. I don’t use them, and VPNs establish and operate just fine. I repeat, I completely skip this step and see no ill-effects.
Azure’s documentation example shows BGP configuration being applied to a Local Network Gateway. I’m not using BGP in my example, but if I were, I could see how this would be a reasonable place to store said BGP peer configuration.
But if that’s the case, then what is the purpose of the nearly identical fields in VPN Site?
Maybe someone can provide a better explanation of the purpose of these Local Network Gateways than I’ve found in the Azure docs.
6. Create Connections#
Step 6 is another step I completely skip. Since I did not create Local Network Gateways in Step 5, there is nothing to connect. The properties it would have me provide again seem redundant from those provided in Step 3. What in tarnation?
Validation#
I’ve learned that the Connectivity Status indicator in Azure is not reliable, or at least its quite slow. If things are in order, eventually it will display the Connected status on a functional VPN, but I’m not sure how long to wait. When I’m troubleshooting, it just tends to add to the confusion because of the non-realtime feedback.
If you control both ends like I do with this ASAv, the far end will probably provide better information about Phase 1 and Phase 2 status.
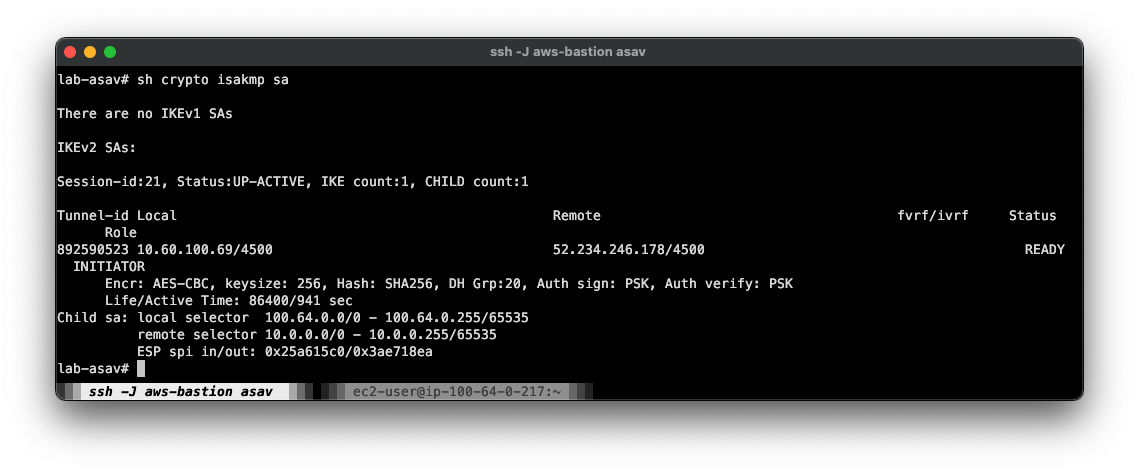
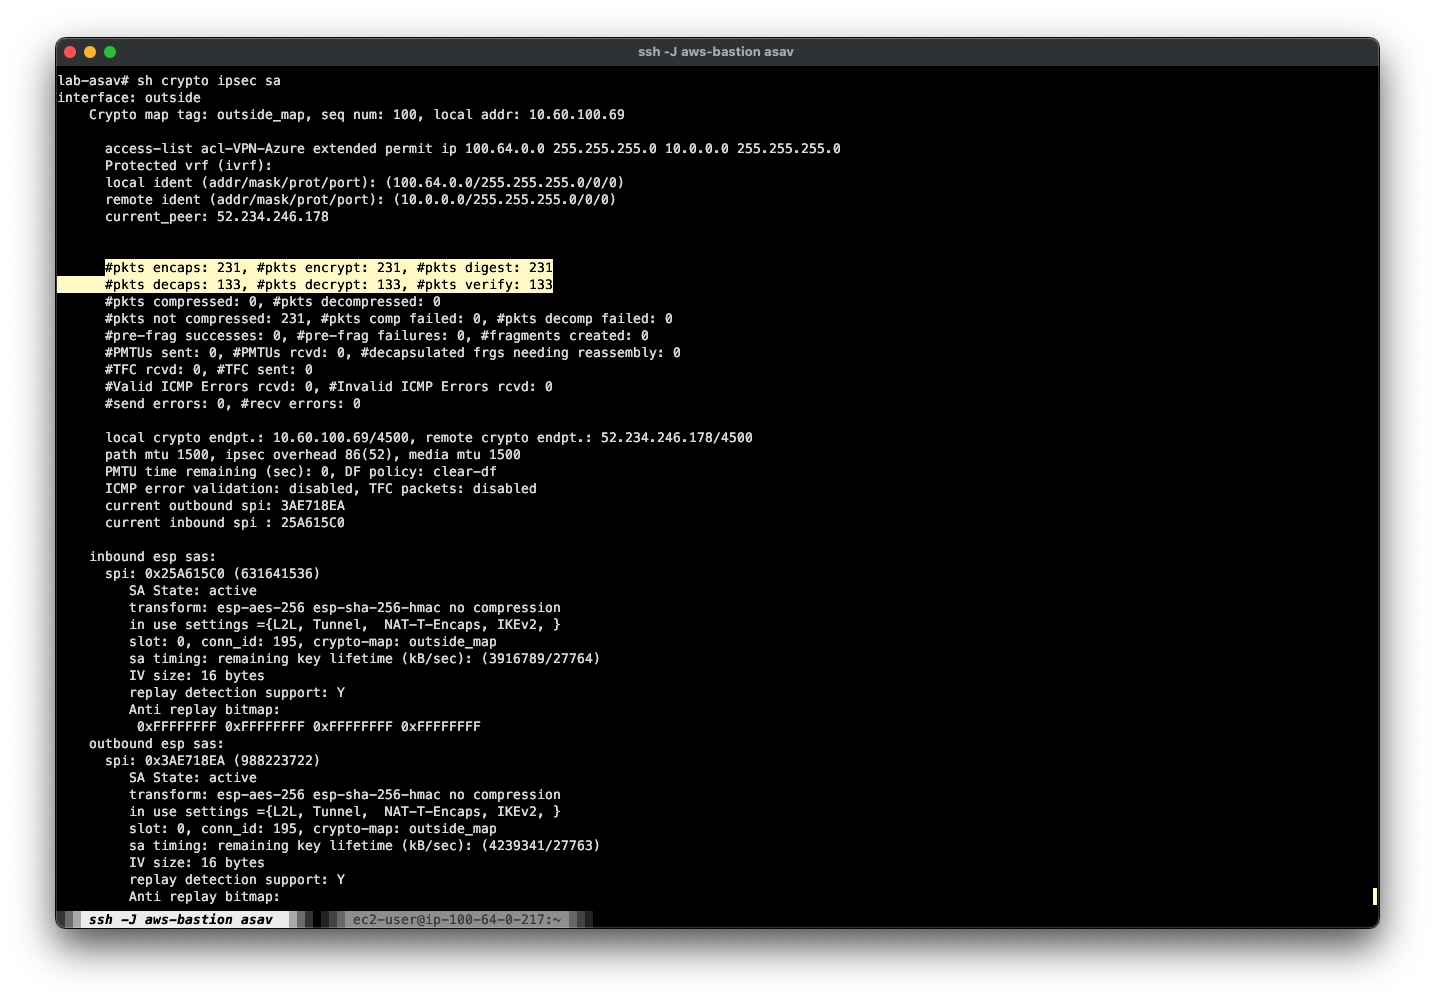
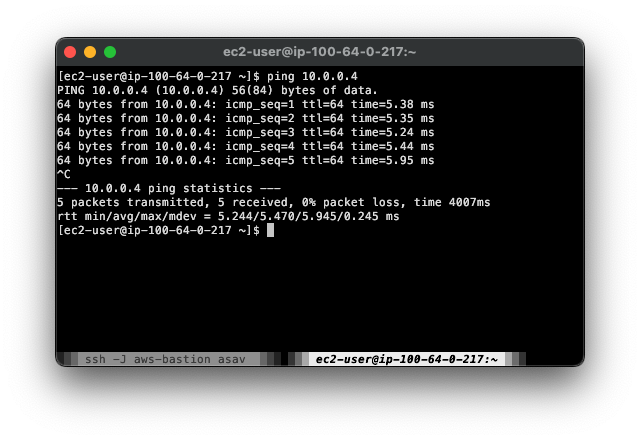
I’ll initiate a ping from the 100.64.0.217 host behind the ASA. It doesn’t matter whether the far end host will accept ICMP, because all I’m really doing is sending something that will match the crypto map interesting traffic ACL, and kick off tunnel initiation.
Troubleshooting#
Troubleshooting IPSEC VPNs is sort of involved, and this setup did not function straight away for me. I’ve decided to create a future stand-alone post on that topic which will largely apply to any situation, regardless of IKE version or route/policy-based VPN. In the meantime, INE has an excellent free course on this topic.
Conclusion#
In the end, the goal has been achieved. There are definitely some nuance about Azure VPNs that I don’t feel I’ve mastered. Please drop a comment if you can shed any light on any of them that I raised in this post.
Bonus Section - Using Object-Groups to define triggering traffic#
I broke this optional step out to keep things simple when initially getting a tunnel working. I prefer this method for manageability though.
! Option using object-groups
object network obj-local-net1
 subnet 100.64.0.0 255.255.255.0

object-group network obj-Local-Nets
 network-object 100.64.0.0 255.255.255.0

object-group network obj-grp-VPN-Azure-Remote-Nets
 network-object 10.0.0.0 255.255.255.0

! Refer to those object groups in the ACL
nat (inside,outside) source static obj-Local-Nets obj-Local-Nets destination static obj-grp-VPN-Azure-Remote-Nets obj-grp-VPN-Azure-Remote-Nets no-proxy-arp route-lookup